
31st Jan 2025 Update
This guide was created for owners of the original disc copies of The Sims 2 and its expansion packs, or the digital Ultimate Collection released in 2014 by EA.
You can now play The Sims 2 on Windows 10/11 by purchasing The Sims 2 Legacy Collection, released by EA, which has been designed to work on modern computers and fixes these issues.
You can purchase this here – or on the EA App – and when buying simply enter the promo code “BEYONDSIMS” at checkout to support BeyondSims and the tutorials we create!
The Sims 2 was released back in September 2004 and, at the time of writing this, that was almost 17 years ago. It was very much designed for operating systems at the time such as Windows 98, ME and XP.
With many fans calling The Sims 2 the best Sims game of all-time, and with EA temporarily releasing “The Sims 2 Ultimate Collection” back in 2014, it’s expected that players may want to re-install and experience the game again. I have recently found myself in this position and struggled to find information in one place to get the game working properly on my computer!
Thankfully, the game does run on newer operating systems such as Windows 8 and Windows 10. However, the graphics do not work as expected with many players experiencing a low resolution of 800×600, bad graphics and – in some cases – glitches with shadows.
This tutorial will show you how to fix the graphical issues with The Sims 2.
Contents
- Increasing the Resolution / Widescreen Support
- NVIDIA cards: Bad Graphics Fix
- Fixing Black Box Shadows on Sims
Increasing the Resolution / Widescreen Support
800×600 is no longer the standard for computers, and it’s also likely your device supports widescreen, so it’s likely you’re going to want to fix this.
- Locate the directory where you have installed The Sims 2 game and go to The Sims 2 -> Latest Pack -> TSData -> Res -> Config.Please note you need to replace ‘Latest Pack’ in the path above with the newest Sims 2 game you have installed based on its release date (e.g. If you had Pets and Freetime installed, it would be Freetime). Refer to this article to see the order of release of Sims 2 games.For Ultimate Collection, it will be The Sims 2 Ultimate Collection -> Fun With Pets -> SP9 -> TSData -> Res -> Config.
- Copy and paste ‘Graphic Rules.sgr’ somewhere on your computer to ensure you have a backup
- Open the file ‘Graphic Rules.sgr’ with Notepad – you may need to open notepad in administrator mode to save any changes we make
- Search for option ScreenModeResolution and under the area of setting $Low you will want to update maxResWidth and maxResHeight to the resolution of your monitor.For example, you may set maxResWidth as 1920 and maxResHeight as 1080 if your monitor resolution is 1920×1080.

- Save the changes you have mdae to Graphic Rules.sgr
- Open The Sims 2 and you will now be able to select a screen resolution up to the highest resolution you specified.
NVIDIA: Bad Graphics Fix
If your graphics are looking a bit pale and bleak, despite them being on high, this may be because your computer has an integrated AND dedicated graphics card. You can usually quickly tell if this is happening – there will be no shadows, grass textures look pale, and the water in neighbourhood views is a solid colour with no reflection at all.
As the game was released in 2004, your NVIDIA control panel won’t automatically identify Sims 2 as a video game, so it will only allow the game to use your integrated card. As The Sims 2 can’t identify what card this is, the graphics look awful.
To fix this if you have an NVIDIA card, try the following steps.
- Open the “Nvidia Control Panel” application on your computer
- In the left sidebar, click on “Manage 3D Settings”
- You will see a screen allowing you to manage your 3D settings and two tabs – one which says “Global Settings” and another that says “Program Settings”. Click on the “Program Settings” tab.
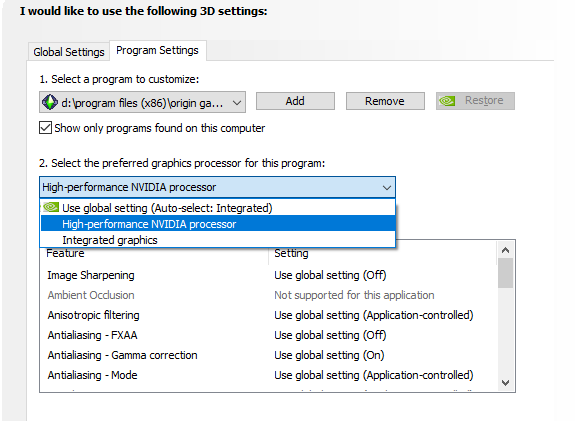
- Press “Add” next to the program drop down and locate your Sims 2 executable file. This can be found in your Sims 2 installation directory by going to The Sims 2 -> Latest Pack -> TSBin.This will need to be the one from the latest Sims 2 pack you have installed based on its release date. For Ultimate Collection, this will be The Sims 2 Ultimate Collection -> Fun With Pets -> SP9 -> TSBin -> Sims2EP9.exe
- Select the preferred graphics processor as “High-performance NVIDIA processor” so that it uses your dedicated graphics card.
- Launch The Sims 2 and you will find the graphics are better
Fixing Black Box Shadows on Sims
A very common issue is that when your Sims are inside of lots, there will be a black box shadow underneath them. There are a few ways to fix this.
Option 1 – Change Shadows to Medium
The easiest is to just change the graphics settings to medium. This will change shadow quality for everything else too, but its a quick and easy fix.
Option 2 – Edit Graphic Rules File
The second way involves editing the Graphic Rules file and allowing shadows for everything apart from Sims, so you get the benefit of the black box disappearing but also can enjoy high-quality shadows on objects etc, which option 1 doesn’t provide.
- Locate the directory where you have installed The Sims 2 game and go to The Sims 2 -> Latest Pack -> TSData -> Res -> Config.Please note you need to replace ‘Latest Pack’ in the path above with the newest Sims 2 game you have installed based on its release date (e.g. If you had Pets and Freetime installed, it would be Freetime). Refer to this article to see the order of release of Sims 2 games.For Ultimate Collection, it will be The Sims 2 Ultimate Collection -> Fun With Pets -> SP9 -> TSData -> Res -> Config.
- Copy and paste ‘Graphic Rules.sgr’ somewhere on your computer to ensure you have a backup
- Open the file ‘Graphic Rules.sgr’ with Notepad – you may need to open notepad in administrator mode to save any changes we make
- Search for option Shadows and under setting $high, you can change simShadows from true to false

- Save the changes you have made and launch The Sims 2.
Enjoy The Sims 2!
Hopefully these hints and tips have helped you get The Sims 2 running on your device. We will continue to update this article as needed so that you can find it all in one place.
Happy Simming!
Nice! I love playing Sims 2 but I don’t like the graphics problems
Do you happen to have a guide for installing TS2 on Windows 10/11? I’m having an issue with getting it to launch + install. Thanks!
this is so good
I’ve been desperate to improve the graphics for my game, I have tried to change the numbers to improve the resolution but it never seems to save – despite saving. Help?!
THANK YOU THANK YOU THANK YOUUUUU I have a new laptop with a NVIDIA and I was so sad thinking I wouldn’t be able to play!! But this fixed it!
Tysm! This guide is a must have for anyone who wants better graphics for the sims 2.
You made a few good points there. I did a search on the subject and found a good number of people will go along with with your blog.
I have been examinating out some of your posts and i must say nice stuff. I will definitely bookmark your blog.
Thank you, I’ve just been looking for info about this subject for ages and yours is the greatest I’ve discovered till now. But, what about the conclusion? Are you sure about the source?
It?¦s really a nice and helpful piece of information. I?¦m satisfied that you just shared this helpful information with us. Please keep us informed like this. Thanks for sharing.
An interesting dialogue is value comment. I think that you should write more on this topic, it may not be a taboo subject but typically people are not enough to talk on such topics. To the next. Cheers
Rattling nice layout and fantastic subject material, practically nothing else we want : D.
Good post. I study one thing more difficult on completely different blogs everyday. It should all the time be stimulating to read content material from different writers and follow somewhat something from their store. I’d desire to make use of some with the content material on my blog whether you don’t mind. Natually I’ll offer you a hyperlink in your net blog. Thanks for sharing.
Very interesting subject, regards for putting up. “There are several good protections against temptations, but the surest is cowardice.” by Mark Twain.
Good write-up, I¦m regular visitor of one¦s website, maintain up the nice operate, and It is going to be a regular visitor for a lengthy time.
After all, what a great site and informative posts, I will upload inbound link – bookmark this web site? Regards, Reader.
Wow! This can be one particular of the most useful blogs We have ever arrive across on this subject. Basically Fantastic. I’m also an expert in this topic therefore I can understand your effort.
I was curious if you ever considered changing the layout of your site? Its very well written; I love what youve got to say. But maybe you could a little more in the way of content so people could connect with it better. Youve got an awful lot of text for only having one or two images. Maybe you could space it out better?
I’ve read several good stuff here. Certainly worth bookmarking for revisiting. I wonder how much effort you put to make such a magnificent informative web site.
Hello this is kinda of off topic but I was wondering if blogs use WYSIWYG editors or if you have to manually code with HTML. I’m starting a blog soon but have no coding expertise so I wanted to get advice from someone with experience. Any help would be greatly appreciated!
I like what you guys are up also. Such smart work and reporting! Keep up the excellent works guys I’ve incorporated you guys to my blogroll. I think it’ll improve the value of my site 🙂
I truly wanted to construct a small comment in order to say thanks to you for some of the remarkable ideas you are giving on this site. My incredibly long internet research has finally been paid with wonderful points to talk about with my good friends. I ‘d mention that we website visitors are quite blessed to live in a really good place with so many outstanding people with very beneficial plans. I feel truly blessed to have used your entire site and look forward to tons of more excellent times reading here. Thank you once again for all the details.
Hello! I just would like to give a huge thumbs up for the great info you have here on this post. I will be coming back to your blog for more soon.
Great website you have here but I was curious about if you knew of any forums that cover the same topics talked about here? I’d really love to be a part of online community where I can get advice from other knowledgeable people that share the same interest. If you have any suggestions, please let me know. Thank you!
Some times its a pain in the ass to read what people wrote but this website is real user genial! .
Thanx for the effort, keep up the good work Great work, I am going to start a small Blog Engine course work using your site I hope you enjoy blogging with the popular BlogEngine.net.Thethoughts you express are really awesome. Hope you will right some more posts.
Do you have a spam issue on this site; I also am a blogger, and I was curious about your situation; many of us have developed some nice practices and we are looking to trade techniques with other folks, be sure to shoot me an e-mail if interested.
You have observed very interesting points! ps nice site. “High school is closer to the core of the American experience than anything else I can think of.” by Kurt Vonnegut, Jr..
You actually make it seem really easy together with your presentation but I find this matter to be actually one thing that I think I would never understand. It seems too complicated and extremely extensive for me. I’m looking forward to your subsequent publish, I¦ll attempt to get the hang of it!
There are actually plenty of details like that to take into consideration. That could be a nice level to convey up. I offer the thoughts above as normal inspiration however clearly there are questions like the one you carry up the place crucial thing can be working in trustworthy good faith. I don?t know if greatest practices have emerged round things like that, however I am sure that your job is clearly identified as a fair game. Each boys and girls really feel the influence of just a moment’s pleasure, for the rest of their lives.
This is a topic close to my heart cheers, where are your contact details though?
Excellent post however , I was wondering if you could write a litte more on this topic? I’d be very grateful if you could elaborate a little bit further. Many thanks!
As a Newbie, I am continuously searching online for articles that can help me. Thank you
Undeniably imagine that that you said. Your favourite reason appeared to be at the web the easiest thing to be mindful of. I say to you, I definitely get irked whilst people think about issues that they just don’t know about. You managed to hit the nail upon the top as smartly as outlined out the whole thing with no need side-effects , other people can take a signal. Will probably be again to get more. Thanks
Howdy very nice website!! Guy .. Excellent .. Superb .. I will bookmark your blog and take the feeds additionally…I’m happy to search out so many helpful information here in the publish, we need develop extra techniques in this regard, thanks for sharing. . . . . .
It¦s truly a great and useful piece of info. I¦m glad that you just shared this useful info with us. Please keep us up to date like this. Thanks for sharing.
There is noticeably a bundle to know about this. I assume you made certain nice points in features also.
I believe this web site has some rattling good information for everyone. “A sense of share is not a bad moral compass.” by Colin.
I got what you mean ,saved to fav, very nice site.
F*ckin¦ awesome things here. I¦m very glad to peer your article. Thanks a lot and i’m having a look forward to touch you. Will you please drop me a e-mail?
Hey! I just wanted to ask if you ever have any issues with hackers? My last blog (wordpress) was hacked and I ended up losing a few months of hard work due to no back up. Do you have any solutions to protect against hackers?
I discovered your blog website on google and check a number of of your early posts. Proceed to keep up the superb operate. I just additional up your RSS feed to my MSN Information Reader. Seeking forward to reading more from you later on!…
Wohh exactly what I was searching for, thanks for posting.
Great write-up, I am regular visitor of one?¦s web site, maintain up the nice operate, and It’s going to be a regular visitor for a lengthy time.
Real clean website , thanks for this post.
Hey just wanted to give you a quick heads up. The words in your content seem to be running off the screen in Chrome. I’m not sure if this is a formatting issue or something to do with internet browser compatibility but I figured I’d post to let you know. The design look great though! Hope you get the issue fixed soon. Kudos
I am really impressed with your writing skills as well as with the layout on your weblog. Is this a paid theme or did you modify it yourself? Anyway keep up the excellent quality writing, it’s rare to see a great blog like this one these days..
Please let me know if you’re looking for a writer for your weblog. You have some really good articles and I feel I would be a good asset. If you ever want to take some of the load off, I’d really like to write some articles for your blog in exchange for a link back to mine. Please blast me an e-mail if interested. Regards!
Hello! This post could not be written any better! Reading through this post reminds me of my old room mate! He always kept talking about this. I will forward this write-up to him. Fairly certain he will have a good read. Many thanks for sharing!
I carry on listening to the news lecture about receiving boundless online grant applications so I have been looking around for the most excellent site to get one. Could you advise me please, where could i acquire some?
Hello my friend! I want to say that this article is amazing, great written and include almost all significant infos. I would like to see extra posts like this .
Excellent blog! Do you have any helpful hints for aspiring writers? I’m planning to start my own site soon but I’m a little lost on everything. Would you advise starting with a free platform like WordPress or go for a paid option? There are so many choices out there that I’m totally confused .. Any tips? Appreciate it!
I believe this internet site has got some really fantastic information for everyone :D. “Believe those who are seeking the truth doubt those who find it.” by Andre Gide.
This internet site is my breathing in, real superb layout and perfect subject matter.
whoah this weblog is wonderful i really like reading your articles. Keep up the good work! You already know, many persons are looking around for this information, you can help them greatly.
What i do not realize is actually how you are not actually much more well-liked than you might be right now. You are very intelligent. You realize therefore significantly relating to this subject, made me personally consider it from numerous varied angles. Its like men and women aren’t fascinated unless it’s one thing to do with Lady gaga! Your own stuffs excellent. Always maintain it up!
Having read this I thought it was very informative. I appreciate you taking the time and effort to put this article together. I once again find myself spending way to much time both reading and commenting. But so what, it was still worth it!
F*ckin’ awesome things here. I’m very happy to see your article. Thank you so much and i’m looking ahead to touch you. Will you please drop me a e-mail?
I like what you guys are up also. Such smart work and reporting! Carry on the excellent works guys I have incorporated you guys to my blogroll. I think it’ll improve the value of my website 🙂
This really answered my problem, thank you!
I was recommended this web site by my cousin. I am not sure whether this post is written by him as nobody else know such detailed about my problem. You are amazing! Thanks!
I have not checked in here for some time because I thought it was getting boring, but the last several posts are good quality so I guess I’ll add you back to my everyday bloglist. You deserve it my friend 🙂
Hiya, I’m really glad I have found this information. Nowadays bloggers publish just about gossips and web and this is actually frustrating. A good website with interesting content, that is what I need. Thank you for keeping this web site, I’ll be visiting it. Do you do newsletters? Can not find it.
Thank you for another informative web site. Where else may I get that kind of information written in such an ideal manner? I have a venture that I’m just now working on, and I’ve been at the look out for such information.
Great write-up, I am regular visitor of one¦s blog, maintain up the nice operate, and It’s going to be a regular visitor for a long time.
I?¦ll right away snatch your rss as I can not find your email subscription link or newsletter service. Do you have any? Please let me realize in order that I may just subscribe. Thanks.
Usually I don’t read article on blogs, but I wish to say that this write-up very forced me to try and do it! Your writing style has been surprised me. Thanks, very nice post.
I think this is one of the most vital info for me. And i am glad reading your article. But wanna remark on few general things, The website style is great, the articles is really excellent : D. Good job, cheers
Hi my family member! I want to say that this article is awesome, nice written and come with approximately all significant infos. I would like to see extra posts like this .
Heya i’m for the first time here. I came across this board and I find It really useful & it helped me out a lot. I hope to give something back and aid others like you helped me.
I’m so happy to read this. This is the kind of manual that needs to be given and not the random misinformation that’s at the other blogs. Appreciate your sharing this greatest doc.
There may be noticeably a bundle to learn about this. I assume you made sure nice points in options also.
As I website possessor I conceive the subject matter here is real superb, thanks for your efforts.
I have been examinating out a few of your posts and it’s pretty good stuff. I will definitely bookmark your site.
Nice post. I learn one thing more challenging on different blogs everyday. It can always be stimulating to read content from different writers and apply just a little one thing from their store. I’d favor to make use of some with the content material on my blog whether you don’t mind. Natually I’ll give you a link in your internet blog. Thanks for sharing.
I love your blog.. very nice colors & theme. Did you create this website yourself or did you hire someone to do it for you? Plz answer back as I’m looking to construct my own blog and would like to find out where u got this from. thanks
I believe this site contains some real excellent info for everyone. “Anger makes dull men witty, but it keeps them poor.” by Francis Bacon.
Hello! I just would like to give a huge thumbs up for the great info you have here on this post. I will be coming back to your blog for more soon.
Real clear web site, thankyou for this post.
Thanks for any other informative website. The place else may just I get that type of information written in such an ideal way? I’ve a project that I am just now working on, and I’ve been at the glance out for such information.
The very root of your writing whilst appearing agreeable initially, did not settle very well with me personally after some time. Somewhere within the sentences you actually were able to make me a believer but only for a short while. I nevertheless have got a problem with your leaps in logic and you might do nicely to help fill in those breaks. In the event that you actually can accomplish that, I could definitely be fascinated.
Throughout the awesome scheme of things you actually secure an A just for effort and hard work. Where you actually confused me was first in all the facts. You know, as the maxim goes, details make or break the argument.. And that could not be much more accurate here. Having said that, permit me say to you just what did do the job. Your authoring is certainly incredibly powerful and that is possibly the reason why I am making an effort to opine. I do not make it a regular habit of doing that. 2nd, although I can certainly notice a jumps in logic you make, I am not necessarily confident of exactly how you appear to unite the details which in turn help to make your conclusion. For the moment I will yield to your position but trust in the future you actually link the dots much better.
Great goods from you, man. I’ve take into accout your stuff previous to and you’re simply extremely magnificent. I actually like what you have acquired here, really like what you’re stating and the way during which you are saying it. You are making it enjoyable and you still take care of to stay it wise. I can not wait to learn much more from you. That is really a tremendous site.
Hello my friend! I wish to say that this article is amazing, nice written and include almost all important infos. I?¦d like to peer more posts like this .
Yeah bookmaking this wasn’t a high risk decision outstanding post! .
What¦s Going down i’m new to this, I stumbled upon this I’ve found It absolutely useful and it has aided me out loads. I hope to give a contribution & assist different customers like its aided me. Good job.
I really like your blog.. very nice colors & theme. Did you design this website yourself or did you hire someone to do it for you? Plz reply as I’m looking to design my own blog and would like to find out where u got this from. thanks a lot
Thank you for sharing excellent informations. Your site is very cool. I am impressed by the details that you’ve on this blog. It reveals how nicely you understand this subject. Bookmarked this website page, will come back for extra articles. You, my pal, ROCK! I found simply the information I already searched everywhere and simply couldn’t come across. What an ideal web-site.
I would like to thank you for the efforts you have put in writing this blog. I am hoping the same high-grade website post from you in the upcoming also. Actually your creative writing abilities has encouraged me to get my own blog now. Actually the blogging is spreading its wings fast. Your write up is a good example of it.
I see something truly special in this internet site.
Mitolyn is a cutting-edge natural dietary supplement designed to support effective weight loss and improve overall wellness.
The Natural Mounjaro Recipe is more than just a diet—it’s a sustainable and natural approach to weight management and overall health.
I’d perpetually want to be update on new articles on this internet site, bookmarked! .
The Natural Mounjaro Recipe is more than just a diet—it’s a sustainable and natural approach to weight management and overall health.
Mitolyn is a cutting-edge natural dietary supplement designed to support effective weight loss and improve overall wellness.
hi!,I like your writing so much! share we communicate more about your post on AOL? I require an expert on this area to solve my problem. May be that’s you! Looking forward to see you.
I conceive this website has some really wonderful info for everyone. “The best friend is the man who in wishing me well wishes it for my sake.” by Aristotle.
The Natural Mounjaro Recipe is more than just a diet—it’s a sustainable and natural approach to weight management and overall health.
This actually answered my downside, thank you!
The Ice Water Hack has gained popularity as a simple yet effective method for boosting metabolism and promoting weight loss.
PrimeBiome is a dietary supplement designed to support gut health by promoting a balanced microbiome, enhancing digestion, and boosting overall well-being.
Thanks so much for giving everyone remarkably marvellous possiblity to discover important secrets from this website. It is often so excellent and as well , stuffed with a lot of fun for me personally and my office friends to visit your site more than 3 times in 7 days to study the new secrets you will have. Of course, we are at all times fascinated with your terrific thoughts you give. Some two facts on this page are completely the most impressive I’ve ever had.
Some really nice and useful information on this internet site, also I believe the layout holds wonderful features.
Hello, you used to write great, but the last few posts have been kinda boringK I miss your great writings. Past few posts are just a bit out of track! come on!
I will right away grab your rss feed as I can not find your e-mail subscription link or newsletter service. Do you have any? Kindly let me know in order that I could subscribe. Thanks.
You should take part in a contest for one of the best blogs on the web. I will recommend this site!
You actually make it seem really easy with your presentation however I to find this topic to be really one thing which I think I would never understand. It seems too complex and very wide for me. I am having a look forward on your subsequent put up, I will try to get the cling of it!
Appreciating the time and energy you put into your site and detailed information you provide. It’s great to come across a blog every once in a while that isn’t the same out of date rehashed material. Great read! I’ve saved your site and I’m adding your RSS feeds to my Google account.
It’s actually a cool and useful piece of information. I’m satisfied that you simply shared this useful information with us. Please stay us up to date like this. Thank you for sharing.
I also think thus, perfectly indited post! .
Hello. magnificent job. I did not anticipate this. This is a remarkable story. Thanks!
I?¦ll immediately grasp your rss feed as I can not find your e-mail subscription link or newsletter service. Do you’ve any? Please permit me recognize in order that I could subscribe. Thanks.
excellent issues altogether, you simply received a new reader. What might you recommend in regards to your publish that you made some days ago? Any positive?
The subsequent time I read a weblog, I hope that it doesnt disappoint me as a lot as this one. I mean, I do know it was my option to read, but I truly thought youd have something attention-grabbing to say. All I hear is a bunch of whining about one thing that you could fix when you werent too busy looking for attention.
Wow! Thank you! I continuously needed to write on my blog something like that. Can I include a part of your post to my website?
Perfectly composed subject material, thanks for information. “The last time I saw him he was walking down Lover’s Lane holding his own hand.” by Fred Allen.
Very interesting subject, regards for putting up. “We need not think alike to love alike.” by Francis David.
Have you ever thought about adding a little bit more than just your articles? I mean, what you say is valuable and all. But think about if you added some great photos or videos to give your posts more, “pop”! Your content is excellent but with pics and clips, this site could certainly be one of the greatest in its niche. Very good blog!
I have been absent for some time, but now I remember why I used to love this blog. Thanks , I will try and check back more often. How frequently you update your web site?
With everything that seems to be developing within this particular subject material, many of your points of view are actually relatively refreshing. However, I appologize, but I do not give credence to your entire suggestion, all be it exciting none the less. It would seem to everyone that your opinions are generally not completely rationalized and in simple fact you are yourself not even thoroughly convinced of your argument. In any event I did take pleasure in reading it.
Thanks for another fantastic article. Where else could anyone get that type of info in such an ideal way of writing? I’ve a presentation next week, and I am on the look for such information.
As soon as I noticed this site I went on reddit to share some of the love with them.
Hello. fantastic job. I did not imagine this. This is a impressive story. Thanks!
I gotta favorite this web site it seems extremely helpful very beneficial
Wonderful website. Plenty of helpful information here. I am sending it to several friends ans also sharing in delicious. And obviously, thank you to your sweat!
Yeah bookmaking this wasn’t a risky decision outstanding post! .
you’re in point of fact a just right webmaster. The website loading velocity is amazing. It kind of feels that you are doing any unique trick. Furthermore, The contents are masterwork. you have performed a magnificent activity in this topic!
You have brought up a very fantastic points, thanks for the post.
Just wish to say your article is as surprising. The clarity in your post is just excellent and i could assume you are an expert on this subject. Well with your permission allow me to grab your feed to keep up to date with forthcoming post. Thanks a million and please carry on the rewarding work.
I always was concerned in this topic and stock still am, regards for putting up.
Get paid to chat – Apply now! $25-$35 / hr ! Are you searching for a job that can be done right away? If so, countless businesses are hiring website chat support agents – no experience is needed, as full training will be provided. As an agent, your duties involve assisting customers with any inquiries they may have through the business’s website, such as questions on discount codes and refund policies. Everything you need to help them is supplied in a document that comes with your role. Additionally, a supervisor will be available if ever tricky questions arise. This contract does not have a fixed length and pays $25-$35 per hour for those who work around 5+ hours weekly. The necessary requirements include access to social media and website chats via a laptop or mobile device, the capability of working alone, being able to stick closely to steps and instructions, plus having a dependable internet connection. Are you ready to take up this opportunity? Click here : https://bit.ly/AmazonOnlineChatSupport to indicate your interest!
I would like to show thanks to you just for bailing me out of this setting. As a result of browsing throughout the online world and seeing principles which were not helpful, I believed my entire life was done. Existing minus the approaches to the difficulties you have resolved as a result of the article content is a critical case, and ones that would have adversely damaged my career if I had not come across your blog. Your good skills and kindness in touching all the stuff was helpful. I’m not sure what I would have done if I hadn’t encountered such a point like this. I am able to at this time look forward to my future. Thank you so much for your skilled and sensible guide. I won’t think twice to recommend the blog to anybody who needs guidance on this problem.
PrimeBiome is a dietary supplement designed to support gut health by promoting a balanced microbiome, enhancing digestion, and boosting overall well-being.
Hello. splendid job. I did not imagine this. This is a impressive story. Thanks!
Hello there, I found your site via Google while looking for a related topic, your web site came up, it looks great. I’ve bookmarked it in my google bookmarks.
Precisely what I was looking for, appreciate it for putting up.
Hello my friend! I wish to say that this article is amazing, nice written and include approximately all important infos. I would like to look extra posts like this.
Thanks , I have recently been looking for info approximately this subject for ages and yours is the greatest I have discovered till now. But, what concerning the conclusion? Are you sure about the source?
I have recently started a website, the info you offer on this web site has helped me greatly. Thank you for all of your time & work.
When I initially commented I clicked the “Notify me when new comments are added” checkbox and now each time a comment is added I get several e-mails with the same comment. Is there any way you can remove me from that service? Many thanks!
Woh I like your articles, bookmarked! .
Mitolyn is a cutting-edge natural dietary supplement designed to support effective weight loss and improve overall wellness.
Hi, i feel that i saw you visited my weblog so i came to “go back the favor”.I am trying to in finding issues to enhance my website!I assume its adequate to use some of your concepts!!
PrimeBiome is a dietary supplement designed to support gut health by promoting a balanced microbiome, enhancing digestion, and boosting overall well-being.
I besides believe therefore, perfectly pent post! .
You made a few nice points there. I did a search on the subject matter and found the majority of persons will have the same opinion with your blog.
The Natural Mounjaro Recipe is more than just a diet—it’s a sustainable and natural approach to weight management and overall health.
An attention-grabbing discussion is worth comment. I believe that you need to write more on this matter, it might not be a taboo subject but usually persons are not sufficient to speak on such topics. To the next. Cheers
Today, I went to the beach with my children. I found a sea shell and gave it to my 4 year old daughter and said “You can hear the ocean if you put this to your ear.” She put the shell to her ear and screamed. There was a hermit crab inside and it pinched her ear. She never wants to go back! LoL I know this is completely off topic but I had to tell someone!
Very interesting subject, regards for putting up. “Wrinkles should merely indicate where smiles have been.” by Mark Twain.
Hi, just wanted to say, I enjoyed this blog post.
It was practical. Keep on posting! https://menbehealth.wordpress.com/
I love it when people come together and share opinions, great blog, keep it up.
Regards for this terrific post, I am glad I observed this site on yahoo.
I simply couldn’t go away your web site prior to suggesting that I actually enjoyed the standard information a person supply on your guests? Is gonna be back continuously in order to check out new posts.
It’s in point of fact a nice and useful piece of info. I am happy that you simply shared this useful information with us. Please keep us up to date like this. Thanks for sharing.
You have brought up a very wonderful points, thanks for the post.
Greetings! I’ve been reading your weblog for a while now and finally got the bravery to go ahead and give you a shout out from Atascocita Texas! Just wanted to tell you keep up the great work!
Definitely imagine that which you said. Your favorite reason seemed to be at the web the easiest thing to remember of. I say to you, I definitely get annoyed while other people consider issues that they plainly don’t recognize about. You controlled to hit the nail upon the highest and outlined out the whole thing with no need side effect , folks can take a signal. Will likely be back to get more. Thank you
Hey! This post couldn’t be written any better! Reading through this post reminds me of my old room mate! He always kept chatting about this. I will forward this write-up to him. Fairly certain he will have a good read. Thanks for sharing!
It’s really a nice and useful piece of info. I am glad that you shared this useful information with us. Please keep us up to date like this. Thanks for sharing.
Thank you, I’ve just been searching for information about this topic for a while and yours is the greatest I have came upon till now. But, what in regards to the conclusion? Are you positive about the source?
After research a number of of the blog posts in your website now, and I actually like your means of blogging. I bookmarked it to my bookmark web site listing and shall be checking back soon. Pls check out my web page as effectively and let me know what you think.
Your style is so unique compared to many other people. Thank you for publishing when you have the opportunity,Guess I will just make this bookmarked.2
I?¦m not sure the place you are getting your information, however good topic. I needs to spend a while learning much more or figuring out more. Thanks for excellent information I used to be looking for this info for my mission.
Hi I am so thrilled I found your website, I really found you by accident, while I was researching on Askjeeve for something else, Anyways I am here now and would just like to say many thanks for a marvelous post and a all round exciting blog (I also love the theme/design), I don’t have time to go through it all at the moment but I have saved it and also added your RSS feeds, so when I have time I will be back to read much more, Please do keep up the fantastic work.
Good article and right to the point. I am not sure if this is actually the best place to ask but do you folks have any thoughts on where to hire some professional writers? Thanks in advance 🙂
We’re a gaggle of volunteers and opening a brand new scheme in our community. Your website offered us with useful info to work on. You have done an impressive activity and our entire neighborhood will likely be thankful to you.
I love it when people come together and share opinions, great blog, keep it up.
Some truly nice stuff on this website , I love it.
Hi , I do believe this is an excellent blog. I stumbled upon it on Yahoo , i will come back once again. Money and freedom is the best way to change, may you be rich and help other people.
Hello. magnificent job. I did not expect this. This is a remarkable story. Thanks!
Hello.This article was extremely remarkable, especially since I was investigating for thoughts on this matter last week.
naturally like your website but you have to check the spelling on several of your posts. Many of them are rife with spelling problems and I find it very bothersome to tell the truth nevertheless I’ll certainly come back again.
Just want to say your article is as amazing. The clarity on your publish is just spectacular and i could think you’re an expert on this subject. Well along with your permission allow me to clutch your feed to keep up to date with forthcoming post. Thanks one million and please keep up the gratifying work.
I believe this website has some really wonderful information for everyone. “The individual will always be a minority. If a man is in a minority of one, we lock him up.” by Oliver Wendell Holmes.
Saved as a favorite, I really like your blog!
Hello! This is kind of off topic but I need some help from an established blog. Is it hard to set up your own blog? I’m not very techincal but I can figure things out pretty fast. I’m thinking about setting up my own but I’m not sure where to begin. Do you have any tips or suggestions? Cheers
It is truly a nice and useful piece of info. I’m satisfied that you shared this helpful information with us. Please keep us up to date like this. Thanks for sharing.
It?¦s really a great and useful piece of information. I?¦m glad that you simply shared this useful information with us. Please keep us informed like this. Thank you for sharing.
Wonderful website. A lot of useful info here. I am sending it to some friends ans also sharing in delicious. And of course, thank you in your effort!
It’s hard to find knowledgeable people on this topic, but you sound like you know what you’re talking about! Thanks
Youre so cool! I dont suppose Ive learn anything like this before. So good to search out anyone with some authentic ideas on this subject. realy thanks for starting this up. this web site is one thing that is needed on the internet, someone with a bit of originality. useful job for bringing one thing new to the web!
Thanks for the good writeup. It actually used to be a leisure account it. Glance complex to more introduced agreeable from you! By the way, how can we keep in touch?
I have not checked in here for a while because I thought it was getting boring, but the last few posts are good quality so I guess I will add you back to my daily bloglist. You deserve it my friend 🙂
Thanks, I have recently been looking for info approximately this subject for ages and yours is the best I have found out so far. But, what about the bottom line? Are you certain concerning the source?
I am glad to be a visitant of this stark website! , thankyou for this rare info ! .
I just could not depart your web site before suggesting that I really enjoyed the standard information a person provide for your visitors? Is going to be back often to check up on new posts
I like this post, enjoyed this one thanks for posting. “No trumpets sound when the important decisions of our life are made. Destiny is made known silently.” by Agnes de Mille.
Se você gosta de fazer compras online e quer pagar menos sem abrir mão da qualidade, o Cupom da Vez é a solução ideal!
Wow! Thank you! I constantly wanted to write on my site something like that. Can I implement a portion of your post to my website?
Just wish to say your article is as surprising. The clearness for your put up is just nice and that i could assume you’re knowledgeable on this subject. Fine together with your permission let me to grab your feed to keep up to date with coming near near post. Thank you one million and please carry on the rewarding work.
As I web site possessor I believe the content matter here is rattling fantastic , appreciate it for your hard work. You should keep it up forever! Best of luck.
you have a great blog here! would you like to make some invite posts on my blog?
Hey there, I think your website might be having browser compatibility issues. When I look at your blog in Safari, it looks fine but when opening in Internet Explorer, it has some overlapping. I just wanted to give you a quick heads up! Other then that, terrific blog!
Hello, Neat post. There is an issue with your web site in internet explorer, could test thisK IE still is the marketplace chief and a good section of other folks will miss your fantastic writing because of this problem.
O Pix My Dollar é um aplicativo de microtarefas: você realiza atividades simples no celular e acumula recompensas, que podem ser convertidas em dinheiro.
I will right away clutch your rss as I can’t find your e-mail subscription link or newsletter service. Do you have any? Please let me recognise in order that I could subscribe. Thanks.
O Pix My Dollar é um aplicativo de microtarefas: você realiza atividades simples no celular e acumula recompensas, que podem ser convertidas em dinheiro.
Attractive section of content. I just stumbled upon your site and in accession capital to assert that I acquire actually enjoyed account your blog posts. Anyway I will be subscribing to your feeds and even I achievement you access consistently quickly.
naturally like your web-site but you have to check the spelling on several of your posts. Many of them are rife with spelling problems and I find it very bothersome to tell the truth nevertheless I will surely come back again.
I enjoy you because of all of your labor on this site. My niece enjoys managing internet research and it’s simple to grasp why. A lot of people learn all concerning the lively way you create very important solutions by means of your web blog and increase contribution from website visitors on the area while our own simple princess is actually starting to learn a great deal. Enjoy the remaining portion of the year. You have been carrying out a really great job.
Do you have a spam issue on this site; I also am a blogger, and I was curious about your situation; we have developed some nice methods and we are looking to exchange techniques with others, why not shoot me an e-mail if interested.
Simply wanna comment on few general things, The website style is perfect, the content material is very superb : D.
Good – I should definitely pronounce, impressed with your website. I had no trouble navigating through all the tabs and related info ended up being truly easy to do to access. I recently found what I hoped for before you know it at all. Quite unusual. Is likely to appreciate it for those who add forums or anything, site theme . a tones way for your client to communicate. Nice task..
I have recently started a blog, the information you offer on this website has helped me tremendously. Thanks for all of your time & work.
I genuinely enjoy looking through on this site, it has fantastic posts. “One should die proudly when it is no longer possible to live proudly.” by Friedrich Wilhelm Nietzsche.
Regards for helping out, wonderful information. “Whoever obeys the gods, to him they particularly listen.” by Homer.
Wow, amazing blog layout! How long have you been blogging for? you make blogging look easy. The overall look of your website is wonderful, as well as the content!
Hello! Do you know if they make any plugins to safeguard against hackers? I’m kinda paranoid about losing everything I’ve worked hard on. Any suggestions?
I like this site so much, saved to bookmarks. “Respect for the fragility and importance of an individual life is still the mark of an educated man.” by Norman Cousins.
I like this site its a master peace ! Glad I detected this on google .
Real instructive and excellent body structure of articles, now that’s user friendly (:.
Hey! Do you use Twitter? I’d like to follow you if that would be ok. I’m absolutely enjoying your blog and look forward to new posts.
I like this website because so much useful material on here : D.
Pretty! This was a really wonderful post. Thank you for your provided information.
I like this post, enjoyed this one thanks for posting.
I am often to blogging and i really appreciate your content. The article has really peaks my interest. I am going to bookmark your site and keep checking for new information.
Magnificent website. Lots of useful info here. I am sending it to several friends ans also sharing in delicious. And of course, thanks for your sweat!
I have been exploring for a little bit for any high-quality articles or blog posts on this sort of area . Exploring in Yahoo I at last stumbled upon this web site. Reading this info So i’m happy to convey that I have a very good uncanny feeling I discovered just what I needed. I most certainly will make certain to don’t forget this site and give it a look regularly.
This really answered my problem, thank you!
Usually I do not read article on blogs, but I wish to say that this write-up very forced me to try and do so! Your writing style has been amazed me. Thanks, quite nice article.
You got a very wonderful website, Sword lily I discovered it through yahoo.
I like your writing style genuinely enjoying this website .
Great post. I was checking continuously this blog and I am impressed! Very helpful information specifically the last part 🙂 I care for such information a lot. I was seeking this particular info for a long time. Thank you and good luck.
I reckon something truly special in this web site.
I have not checked in here for a while because I thought it was getting boring, but the last few posts are good quality so I guess I’ll add you back to my daily bloglist. You deserve it my friend 🙂
The next time I read a blog, I hope that it doesnt disappoint me as much as this one. I mean, I know it was my choice to read, but I actually thought youd have something interesting to say. All I hear is a bunch of whining about something that you could fix if you werent too busy looking for attention.
I adore reading through and I conceive this website got some genuinely utilitarian stuff on it! .
Hi there, just became alert to your blog through Google, and found that it is truly informative. I am going to watch out for brussels. I will appreciate if you continue this in future. Lots of people will be benefited from your writing. Cheers!
Precisely what I was searching for, thankyou for posting.
I think other web-site proprietors should take this web site as an model, very clean and great user friendly style and design, let alone the content. You are an expert in this topic!
Loving the information on this internet site, you have done great job on the blog posts.
Attractive element of content. I simply stumbled upon your weblog and in accession capital to assert that I get in fact enjoyed account your blog posts. Any way I’ll be subscribing for your augment and even I fulfillment you get entry to consistently rapidly.
I have been browsing online more than 3 hours today, yet I never found any interesting article like yours. It is pretty worth enough for me. In my opinion, if all webmasters and bloggers made good content as you did, the web will be much more useful than ever before.
I saw a lot of website but I believe this one contains something special in it in it
I think other web-site proprietors should take this site as an model, very clean and magnificent user genial style and design, as well as the content. You are an expert in this topic!
Enjoyed examining this, very good stuff, regards. “Shared joys make a friend, not shared sufferings.” by Friedrich Wilhelm Nietzsche.
Great post, I conceive people should larn a lot from this site its really user genial.
I am glad to be one of the visitants on this outstanding web site (:, regards for putting up.
Thanks for sharing excellent informations. Your web-site is very cool. I’m impressed by the details that you?¦ve on this web site. It reveals how nicely you understand this subject. Bookmarked this web page, will come back for extra articles. You, my friend, ROCK! I found simply the information I already searched all over the place and just could not come across. What a great web site.
Awesome blog you have here but I was wondering if you knew of any user discussion forums that cover the same topics talked about here? I’d really love to be a part of online community where I can get responses from other knowledgeable individuals that share the same interest. If you have any suggestions, please let me know. Thanks a lot!
Fantastic beat ! I wish to apprentice while you amend your site, how could i subscribe for a blog web site? The account aided me a acceptable deal. I had been a little bit acquainted of this your broadcast offered bright clear concept
I wanted to thank you for this great read!! I definitely enjoying every little bit of it I have you bookmarked to check out new stuff you post…
I truly appreciate this post. I have been looking all over for this! Thank goodness I found it on Bing. You have made my day! Thank you again
I am impressed with this web site, rattling I am a big fan .
Have you ever thought about adding a little bit more than just your articles? I mean, what you say is important and everything. Nevertheless think of if you added some great images or videos to give your posts more, “pop”! Your content is excellent but with images and video clips, this site could undeniably be one of the best in its niche. Great blog!
Hello there, just became aware of your blog through Google, and found that it is really informative. I am going to watch out for brussels. I’ll appreciate if you continue this in future. Numerous people will be benefited from your writing. Cheers!
I have been surfing on-line greater than 3 hours these days, but I never found any interesting article like yours. It?¦s lovely worth enough for me. In my opinion, if all webmasters and bloggers made excellent content material as you did, the web shall be much more helpful than ever before.
Good day! I know this is somewhat off topic but I was wondering if you knew where I could find a captcha plugin for my comment form? I’m using the same blog platform as yours and I’m having problems finding one? Thanks a lot!
Wonderful goods from you, man. I have understand your stuff previous to and you’re just too great. I actually like what you’ve acquired here, really like what you are saying and the way in which you say it. You make it enjoyable and you still care for to keep it smart. I can’t wait to read far more from you. This is really a terrific web site.
Hello my friend! I want to say that this post is amazing, nice written and include almost all important infos. I would like to see more posts like this.
Your style is so unique compared to many other people. Thank you for publishing when you have the opportunity,Guess I will just make this bookmarked.2
Thanks for the sensible critique. Me and my neighbor were just preparing to do a little research about this. We got a grab a book from our area library but I think I learned more from this post. I’m very glad to see such wonderful information being shared freely out there.
obviously like your web-site but you need to test the spelling on several of your posts. Many of them are rife with spelling issues and I in finding it very bothersome to tell the reality however I?¦ll certainly come again again.
Thanks a lot for sharing this with all of us you actually know what you are talking about! Bookmarked. Kindly also visit my web site =). We could have a link exchange agreement between us!
I’ll immediately grasp your rss feed as I can not to find your email subscription hyperlink or e-newsletter service. Do you have any? Please let me recognize so that I may subscribe. Thanks.
I do not even know how I ended up here, but I assumed this post was once great. I don’t know who you might be however certainly you are going to a famous blogger in case you aren’t already 😉 Cheers!
Thanks a bunch for sharing this with all of us you really know what you’re talking about! Bookmarked. Kindly also visit my site =). We could have a link exchange contract between us!
Great write-up, I?¦m normal visitor of one?¦s site, maintain up the excellent operate, and It’s going to be a regular visitor for a long time.
Some genuinely nice and useful information on this internet site, as well I think the layout has great features.
It’s exhausting to find educated folks on this topic, but you sound like you know what you’re speaking about! Thanks
Very interesting info !Perfect just what I was looking for!
Thanx for the effort, keep up the good work Great work, I am going to start a small Blog Engine course work using your site I hope you enjoy blogging with the popular BlogEngine.net.Thethoughts you express are really awesome. Hope you will right some more posts.
I would like to thnkx for the efforts you have put in writing this blog. I am hoping the same high-grade blog post from you in the upcoming as well. In fact your creative writing abilities has inspired me to get my own blog now. Really the blogging is spreading its wings quickly. Your write up is a good example of it.
Wonderful site. Plenty of useful information here. I am sending it to several friends ans also sharing in delicious. And naturally, thanks for your sweat!
As I website possessor I believe the content material here is rattling fantastic , appreciate it for your hard work. You should keep it up forever! Best of luck.
Keep functioning ,terrific job!
The Natural Mounjaro Recipe is more than just a diet—it’s a sustainable and natural approach to weight management and overall health.
The Natural Mounjaro Recipe is more than just a diet—it’s a sustainable and natural approach to weight management and overall health.
Hi would you mind letting me know which webhost you’re using? I’ve loaded your blog in 3 different web browsers and I must say this blog loads a lot quicker then most. Can you recommend a good web hosting provider at a fair price? Cheers, I appreciate it!
I love gathering useful information , this post has got me even more info! .
Keep up the fantastic work, I read few posts on this site and I conceive that your web site is real interesting and has sets of excellent information.
The next time I learn a blog, I hope that it doesnt disappoint me as a lot as this one. I mean, I know it was my option to learn, but I really thought youd have one thing interesting to say. All I hear is a bunch of whining about something that you would fix when you werent too busy looking for attention.
Excellent blog here! Also your web site loads up very fast! What host are you using? Can I get your affiliate link to your host? I wish my website loaded up as quickly as yours lol
whoah this blog is wonderful i love reading your articles. Keep up the great work! You know, many people are looking around for this information, you can help them greatly.
Good write-up, I am regular visitor of one’s site, maintain up the nice operate, and It is going to be a regular visitor for a long time.
Glad to be one of many visitants on this awesome website : D.
Hello there I am so grateful I found your blog page, I really found you by accident, while I was looking on Google for something else, Anyhow I am here now and would just like to say many thanks for a remarkable post and a all round thrilling blog (I also love the theme/design), I don’t have time to browse it all at the moment but I have saved it and also included your RSS feeds, so when I have time I will be back to read a great deal more, Please do keep up the excellent job.
Youre so cool! I dont suppose Ive read anything like this before. So nice to seek out anyone with some authentic ideas on this subject. realy thanks for starting this up. this website is something that is needed on the web, someone with a little bit originality. helpful job for bringing something new to the web!
Its such as you learn my mind! You appear to grasp so much approximately this, like you wrote the e book in it or something. I think that you just can do with some p.c. to power the message home a bit, however instead of that, that is fantastic blog. A fantastic read. I’ll certainly be back.
I have recently started a website, the info you provide on this website has helped me greatly. Thanks for all of your time & work.
I was reading some of your posts on this internet site and I think this web site is very informative ! Keep on posting.
Whoa! This blog looks exactly like my old one! It’s on a totally different topic but it has pretty much the same page layout and design. Wonderful choice of colors!
Hi there! This post couldn’t be written any better! Reading through this post reminds me of my previous room mate! He always kept talking about this. I will forward this article to him. Pretty sure he will have a good read. Thank you for sharing!
excellent post, very informative. I wonder why the other specialists of this sector don’t notice this. You must continue your writing. I am sure, you’ve a huge readers’ base already!
I love meeting utile info, this post has got me even more info! .
I am not very excellent with English but I get hold this really easy to interpret.
Great paintings! That is the kind of info that should be shared across the web. Disgrace on Google for not positioning this publish upper! Come on over and visit my website . Thank you =)
Spot on with this write-up, I truly assume this website needs much more consideration. I’ll probably be once more to read way more, thanks for that info.
The Ice Water Hack has been gaining popularity as a simple method to aid weight loss. After reading about its potential benefits, I decided to give it a shot and see how it worked for me. Here’s what I found!
I love your blog.. very nice colors & theme. Did you create this website yourself? Plz reply back as I’m looking to create my own blog and would like to know wheere u got this from. thanks
Utterly written subject material, Really enjoyed looking through.
I have been surfing online more than 3 hours today, yet I never found any interesting article like yours. It is pretty worth enough for me. Personally, if all site owners and bloggers made good content as you did, the web will be a lot more useful than ever before.
An impressive share, I just given this onto a colleague who was doing a little analysis on this. And he in fact bought me breakfast because I found it for him.. smile. So let me reword that: Thnx for the treat! But yeah Thnkx for spending the time to discuss this, I feel strongly about it and love reading more on this topic. If possible, as you become expertise, would you mind updating your blog with more details? It is highly helpful for me. Big thumb up for this blog post!
I really like your writing style, superb info, thank you for posting :D. “Your central self is totally untouched By grief, confusion, desperation.” by Vernon Howard.
Yeah bookmaking this wasn’t a high risk decision outstanding post! .
I like this website very much, Its a rattling nice berth to read and obtain information.
Some really nice and useful information on this internet site, as well I think the layout has good features.
I like this blog so much, saved to favorites. “Nostalgia isn’t what it used to be.” by Peter De Vries.
Thank you for sharing with us, I believe this website really stands out : D.
F*ckin’ amazing issues here. I’m very satisfied to peer your article. Thanks a lot and i’m having a look ahead to touch you. Will you kindly drop me a mail?
My partner and I absolutely love your blog and find the majority of your post’s to be exactly what I’m looking for. Do you offer guest writers to write content in your case? I wouldn’t mind writing a post or elaborating on some of the subjects you write with regards to here. Again, awesome site!
obviously like your website but you need to check the spelling on several of your posts. A number of them are rife with spelling issues and I find it very troublesome to inform the truth then again I will surely come back again.
Wow! This could be one particular of the most helpful blogs We’ve ever arrive across on this subject. Basically Excellent. I’m also a specialist in this topic therefore I can understand your hard work.
Would you be all for exchanging links?
Rattling great information can be found on site. “An executive is a person who always decides sometimes he decides correctly, but he always decides.” by John H. Patterson.
I regard something genuinely special in this internet site.
fabuloso este conteúdo. Gostei muito. Aproveitem e vejam este site. informações, novidades e muito mais. Não deixem de acessar para se informar mais. Obrigado a todos e até mais. 🙂
Mitolyn is a cutting-edge natural dietary supplement designed to support effective weight loss and improve overall wellness.
I’ve been exploring for a little bit for any high quality articles or weblog posts in this sort of area . Exploring in Yahoo I eventually stumbled upon this website. Reading this information So i’m glad to express that I have a very just right uncanny feeling I came upon just what I needed. I so much undoubtedly will make certain to do not disregard this site and provides it a glance on a continuing basis.
PrimeBiome is a dietary supplement designed to support gut health by promoting a balanced microbiome, enhancing digestion, and boosting overall well-being.
Some times its a pain in the ass to read what people wrote but this site is real user friendly! .
Nice read, I just passed this onto a friend who was doing some research on that. And he actually bought me lunch because I found it for him smile Thus let me rephrase that: Thank you for lunch!
As a Newbie, I am always exploring online for articles that can benefit me. Thank you
Hiya, I’m really glad I have found this information. Nowadays bloggers publish only about gossips and web and this is really annoying. A good blog with exciting content, that’s what I need. Thanks for keeping this web-site, I will be visiting it. Do you do newsletters? Can’t find it.
I and also my guys appeared to be analyzing the excellent information on your web page and then immediately I had a horrible suspicion I had not expressed respect to you for those techniques. The women ended up stimulated to read through all of them and already have definitely been taking pleasure in these things. Appreciation for being considerably kind as well as for going for this kind of magnificent tips millions of individuals are really eager to be informed on. Our own sincere regret for not expressing appreciation to earlier.
I’ve been surfing on-line more than three hours lately, but I never discovered any fascinating article like yours. It is lovely worth enough for me. Personally, if all webmasters and bloggers made excellent content as you did, the web will probably be a lot more helpful than ever before.
… [Trackback]
[…] Read More Infos here: beyondsims.com/2021/01/the-sims-2-fixing-the-graphics-on-newer-computers/ […]
Write Blog Posts – $35 an Hour. We are currently hiring new writers on our platform for entry-level blog writing jobs. The pay starts at $35 per hour, and full training is provided. You will be working for e-commerce stores, helping write short blog posts introducing their new products. Check out here: https//bit.ly/PaidOnlineWritingsJob to complete your application if you are interested.
It’s really a cool and useful piece of info. I am glad that you shared this helpful information with us. Please keep us up to date like this. Thanks for sharing.
I am continuously invstigating online for ideas that can aid me. Thanks!
I have not checked in here for a while because I thought it was getting boring, but the last several posts are good quality so I guess I’ll add you back to my everyday bloglist. You deserve it my friend 🙂
What’s Happening i am new to this, I stumbled upon this I have found It positively helpful and it has aided me out loads. I hope to contribute & assist other users like its aided me. Good job.
I enjoy your writing style genuinely enjoying this site.
Hiya, I’m really glad I have found this information. Today bloggers publish just about gossips and web and this is actually frustrating. A good website with exciting content, this is what I need. Thank you for keeping this web-site, I will be visiting it. Do you do newsletters? Can not find it.
Good info. Lucky me I reach on your website by accident, I bookmarked it.
Thanks for the good writeup. It in fact was a amusement account it. Glance complicated to more added agreeable from you! However, how can we communicate?
It is really a nice and helpful piece of information. I am satisfied that you simply shared this useful info with us. Please keep us up to date like this. Thanks for sharing.
You should take part in a contest for one of the best blogs on the web. I will recommend this site!
Does your blog have a contact page? I’m having problems locating it but, I’d like to send you an email. I’ve got some suggestions for your blog you might be interested in hearing. Either way, great website and I look forward to seeing it develop over time.
Hi there, You have done a great job. I will certainly digg it and personally recommend to my friends. I am sure they will be benefited from this web site.
Have you ever thought about publishing an e-book or guest authoring on other blogs? I have a blog centered on the same topics you discuss and would love to have you share some stories/information. I know my subscribers would appreciate your work. If you’re even remotely interested, feel free to send me an e mail.
It is in point of fact a great and useful piece of info. I’m happy that you shared this useful information with us. Please keep us informed like this. Thanks for sharing.
It is really a nice and useful piece of info. I’m glad that you shared this helpful information with us. Please keep us up to date like this. Thanks for sharing.
I don’t think the title of your article matches the content lol. Just kidding, mainly because I had some doubts after reading the article.
Thanx for the effort, keep up the good work Great work, I am going to start a small Blog Engine course work using your site I hope you enjoy blogging with the popular BlogEngine.net.Thethoughts you express are really awesome. Hope you will right some more posts.
Write Blog Posts – $35 an Hour. We are currently hiring new writers on our platform for entry-level blog writing jobs. The pay starts at $35 per hour, and full training is provided. You will be working for e-commerce stores, helping write short blog posts introducing their new products. Check out here: https://bit.ly/PaidOnlineWritingsJob to complete your application if you are interested.
whoah this blog is fantastic i love reading your articles. Keep up the good work! You know, a lot of people are hunting around for this information, you could help them greatly.
I just like the helpful info you supply to your articles. I will bookmark your weblog and take a look at once more here regularly. I’m rather certain I will learn many new stuff right right here! Best of luck for the next!
I enjoy, lead to I discovered exactly what I used to be taking a look for. You have ended my 4 day long hunt! God Bless you man. Have a nice day. Bye
Loving the information on this web site, you have done outstanding job on the posts.
Hi there, this weekend is nice designed for me,
for the reason that this occasion i am reading this fantastic informative piece of writing here at my residence.
my homepage … lipovive reviews
Heya! I’m at work surfing around your blog from my new iphone 3gs! Just wanted to say I love reading through your blog and look forward to all your posts! Carry on the excellent work!
Simply wanna remark on few general things, The website design is perfect, the content material is rattling fantastic : D.
This website is my aspiration, real superb style and design and perfect articles.
Great post. I’m going through a few of these issues as well..
Feel free to surf to my homepage :: vigorlong
Yesterday, while I was at work, my sister stole my iPad and tested
to see if it can survive a forty foot drop, just so she can be a youtube sensation. My
apple ipad is now destroyed and she has 83 views.
I know this is totally off topic but I had to share it with someone!
My blog; prozenith
Asking questions are truly good thing if you are not
understanding anything totally, except this article presents good
understanding even.
Look into my web site; beastforce review
I was reading through some of your content on this website and I think this internet site is very informative! Keep putting up.
I was wondering if you ever considered changing the page layout of your website? Its very well written; I love what youve got to say. But maybe you could a little more in the way of content so people could connect with it better. Youve got an awful lot of text for only having one or two pictures. Maybe you could space it out better?
Yesterday, while I was at work, my sister stole my apple ipad and tested to see if it can survive a thirty foot drop, just so she can be a youtube sensation. My apple ipad is now broken and she has 83 views. I know this is completely off topic but I had to share it with someone!
Terrific paintings! That is the type of information that are meant to be shared across the net. Disgrace on the seek engines for no longer positioning this post upper! Come on over and seek advice from my web site . Thanks =)
I reckon something truly special in this site.
Have you ever thought about adding a little bit more than just your articles? I mean, what you say is important and everything. However imagine if you added some great pictures or video clips to give your posts more, “pop”! Your content is excellent but with images and video clips, this blog could undeniably be one of the very best in its niche. Amazing blog!
The Pink Salt Trick is a minimalist but effective morning routine: Just drink a glass of lukewarm water mixed with a pinch of Himalayan pink salt as soo
text:
I’m not sure why but this weblog is loading incredibly slow for me. Is anyone else having this problem or is it a issue on my end? I’ll check back later on and see if the problem still exists.
I’ve been browsing online more than 3 hours today, yet I never found any interesting article like yours. It’s pretty worth enough for me. Personally, if all webmasters and bloggers made good content as you did, the net will be much more useful than ever before.
I think this web site contains some real superb information for everyone. “The penalty of success is to be bored by the attentions of people who formerly snubbed you.” by Mary Wilson Little.
Of course, what a magnificent website and enlightening posts, I surely will bookmark your website.Have an awsome day!
Wonderful work! This is the type of info that should be shared around the net. Shame on the search engines for not positioning this post higher! Come on over and visit my site . Thanks =)
obviously like your web site but you need to take a look at the spelling on several of your posts. A number of them are rife with spelling issues and I find it very troublesome to inform the truth on the other hand I will surely come again again.
Hello, i read your blog occasionally and i own a similar one and i was just wondering if you get a lot of spam remarks? If so how do you protect against it, any plugin or anything you can suggest? I get so much lately it’s driving me mad so any support is very much appreciated.
Some truly interesting points you have written.Helped me a lot, just what I was looking for : D.
The Pink Salt Trick is a minimalist but effective morning routine: Just drink a glass of lukewarm water mixed with a pinch of Himalayan pink salt as soon as you wake up.
Do you have a spam issue on this blog; I also am a blogger, and I was curious about your situation; many of us have developed some nice procedures and we are looking to trade methods with others, why not shoot me an email if interested.
I haven’t checked in here for a while as I thought it was getting boring, but the last few posts are great quality so I guess I will add you back to my daily bloglist. You deserve it my friend 🙂
Sleep Lean is a natural nighttime weight management supplement designed to help you burn fat, improve sleep quality, and balance hormones—all while you rest.
The ice water hack is a simple trick that involves using cold water to naturally activate your body’s thermogenic process. When you drink ice water, your body has to work harder to regulate its temperature, burning extra calories in the process.
I?¦ve recently started a site, the info you provide on this site has helped me greatly. Thanks for all of your time & work.
You are my intake, I have few web logs and sometimes run out from to post .
I’ve recently started a web site, the info you offer on this site has helped me greatly. Thank you for all of your time & work.
I haven’t checked in here for a while because I thought it was getting boring, but the last several posts are good quality so I guess I’ll add you back to my daily bloglist. You deserve it my friend 🙂
I really like your writing style, fantastic info, regards for posting :D. “Silence is more musical than any song.” by Christina G. Rossetti.
Hi there, You’ve done a great job. I will definitely digg it and personally suggest to my friends. I am sure they’ll be benefited from this site.
you’re actually a excellent webmaster. The web site loading speed is amazing. It seems that you’re doing any unique trick. Moreover, The contents are masterpiece. you have performed a excellent process in this matter!
I like what you guys are up also. Such clever work and reporting! Keep up the excellent works guys I¦ve incorporated you guys to my blogroll. I think it’ll improve the value of my site 🙂
Thank you for the good writeup. It in fact was a enjoyment account it. Look advanced to more introduced agreeable from you! By the way, how can we keep in touch?
I would like to thnkx for the efforts you have put in writing this blog. I am hoping the same high-grade blog post from you in the upcoming as well. In fact your creative writing abilities has inspired me to get my own blog now. Really the blogging is spreading its wings quickly. Your write up is a good example of it.
Very nice post. I just stumbled upon your weblog and wanted to say that I have truly enjoyed surfing around your weblog posts. In any case I will be subscribing on your feed and I’m hoping you write once more soon!
I have been absent for a while, but now I remember why I used to love this website. Thanks, I’ll try and check back more frequently. How frequently you update your site?
Hello.This article was extremely remarkable, particularly since I was searching for thoughts on this issue last Saturday.
I just couldn’t leave your site before suggesting that I actually loved the usual information a person supply for your guests? Is going to be back continuously in order to investigate cross-check new posts
I appreciate, cause I found exactly what I was looking for. You have ended my four day long hunt! God Bless you man. Have a great day. Bye
I am usually to running a blog and i actually admire your content. The article has really peaks my interest. I’m going to bookmark your web site and keep checking for new information.
Hi to all, the contents existing at this website are truly amazing for people experience, well, keep up the good work fellows.
Check out my web-site: ereforce reviews
An interesting discussion is worth comment. I think that you should write more on this topic, it might not be a taboo subject but generally people are not enough to speak on such topics. To the next. Cheers
Great write-up, I am regular visitor of one?¦s blog, maintain up the excellent operate, and It’s going to be a regular visitor for a lengthy time.
I love how simple yet effective your website design is.