
31st Jan 2025 Update
This guide was created for owners of the original disc copies of The Sims and its expansion packs.
The easiest way to play The Sims on Windows 10/11 is to purchase The Sims Legacy Edition, released by EA, which has been created to play on Windows 10/11 and includes all expansions.
You can purchase this here or on the EA App – simply enter the promo code “BEYONDSIMS” at the point of purchase on the EA App/Website to support us!
Tutorial for Original Disc Copies of The Sims
With The Sims recently celebrating its 21st anniversary at the time of originally writing this tutorial, I have been in a nostalgic mood and re-discovering older Sims titles. And that has included going back to where it all started!
The Sims was released in 2000 and was compatible with Windows 95, 98 and ME machines. Even Windows XP wasn’t around when it launched. With hardware and software moving so far ahead since, it’s natural that the game now has some compatibility issues.
This guide should help you overcome common problems when installing the game and help you get The Sims 1 working as well as possible on newer computers running Windows 11, Windows 10, Windows 8 and even Windows 7.
Contents
- Step 1 – Installing the The Sims 1 and Expansions Correctly
- Step 2 – Installing Windows 11/10/8/7 Patch (Optional, But Recommended)
- Step 3 – Configuring Compatibility Settings
- Step 4 – Set Screen Resolution and Play in Windowed Mode
- Troubleshooting – Resolving common errors

Step 1 – Installing The Sims 1 and Expansions Correctly
It is important that you install all of the packs that you own in the order that they were released – otherwise you will have to jump through all sorts of hoops to get the game working which will involve uninstalling and reinstalling things!
I know we are all looking for things to do to pass time but, for the sake of your time and sanity, refer to the list below to see the order you should install your games. If you follow this, you will find that your installation process is fairly smooth and means you’ll get to play with all of the expansions.
As The Sims 1 was released so long ago, it isn’t available for download from official sources, so you’ll need to rely on all of your CDs! Now, if you do not have a DVD drive on your computer then you will need to purchase an external USB one. These are fairly inexpensive to purchase from somewhere like Amazon or a computer retailer.
If you are having any problems with getting the setup started or problems getting the game to run, which is highly likely on newer operating systems, then I recommend scrolling down to the troubleshooting section! It’s highly likely you’ll need to manually launch the setup for each game you install.
Install your games in the following order:
| The Sims (or The Sims Double/Triple Deluxe, which includes Livin’ Large) | |
 |
The Sims Livin’ Large / Livin’ It Up |
 |
The Sims House Party |
 |
The Sims Hot Date |
 |
The Sims Vacation/On Holiday |
 |
The Sims Unleashed |
 |
The Sims Superstar |
 |
The Sims Makin’ Magic |
Step 2 – Installing Windows 11/10/8/7 Patch (Optional, But Recommended)
 This step is completely optional and we are not responsible for monitoring content on third-party websites or downloads. We will not be held responsible for corrupted or inoperable gameplay caused by the installation, use, or modification.
A Simmer by the name of SariaFan93 has created a very helpful Windows 10/8/7 patch which will help you get the game working on newer machines and allows you to play without the disc present.
Please note this patch will only work with all expansions installed, or The Sims Complete Collection, and must be installed from the physical discs.
- Go to the directory where you have installed The Sims (this is typically C:\Program Files (x86)\Maxis\The Sims)
- Find Sims.exe and rename this to Sims.old – do not delete this
- Download the new Sims.exe file by clicking here
- Move the new Sims.exe file you have downloaded to the directory where you have installed The Sims (this is typically C:\Program Files (x86)\Maxis\The Sims)
- Right click on Sims.exe and add a shortcut to your desktop for easy access to launch the game

In the unlikely event you encounter any problems, you can delete the new Sims.exe file from your Sims installation directory, and rename Sims.old file back to Sims.exe if needed.
Step 3 – Configuring Compatibility Settings
Before you launch the game, it is important that you configure the appropriate compatbility settings for The Sims 1 to ensure the game runs as well as possible!
- Go to the directory where you have installed The Sims (this is typically C:\Program Files (x86)\Maxis\The Sims)
- Right click on Sims.exe and click on properties
- Click on the “Compatibility” tab at the top
- Tick the box beside “Run this program in compatibility mode for:” and select “Windows 7”
- Tick the box beside “Run as administrator”
- If you haven’t done this already, right click on Sims.exe and add a shortcut to your desktop for easy access to launch the game

Step 4 – Set Screen Resolution and Play in Windowed Mode
The Sims will open in full screen and at 800×600 resolution by default. Follow the instructions below to set it to run at 1024×768 and to open in windowed mode, if you wish.
- Right click the shortcut to Sims.exe on your desktop
- In the “Shortcut” tab, add the following to the end of the Target text field: -w -r1024x768
- -w makes the game start in Windowed Mode – do not add this if you want to play in full screen
- -r1024x768 makes the game open in a resolution of 1024×768, the maximum supported resolution for The Sims 1
- Press OK to save the changes

Congratulations! You should now be able to launch and play The Sims 1 on Windows 10, Windows 8 and Windows 7 machines. All you have to do now is click on the shortcut on your desktop to get started!
You may still experience some issues such as performance or crashes, due to the age of the game, but these steps should give you the best chance of having a good experience.
Remember to always save regularly in the event the game were to crash, and to enjoy re-discovering the game that started it all!

Troubleshooting – Resolving common errors
Before you can even get the game to install and play the game, you may hit some errors. These steps should help you troubleshoot some of the common errors faced.
This section has been recently updated with a fix for Windows 11 operating systems / newer graphics cards!
Windows 11 Fix / Game Not Launching
A Windows 11 update in late 2022 caused The Sims 1 to stop working for many users. This section should help you get the game working again – and may work on older operating systems too if you have a newer graphics card.
- Download the latest stable version of dgVoodoo2 – this will be in a .zip format
- Open the zip file and extract “dgVoodooCpl.exe” to the directory where you have installed The Sims (typically C:\Program Files (x86)\Maxis\The Sims).
- Within the same zip file, go into the folder MS -> x86 and copy the .dll files to the directory where you have installed The Sims
- If prompted by UAC for permission to copy, or if you are asked if you want to over write any files, press allow.
- Go to the directory where you have installed The Sims and double click on “dgVoodooCpl.exe”
- Click on the “DirectX” tab and configure the following settings:
- Set the video card setting to “dgVoodoo Virtual 3D Accelerated Card”
- Uncheck the “dgVoodoo Watermark” setting

- Press “Apply” and close the dgVoodoo application
- Try launching The Sims and it should now work – this may overwrite your preferred resolution settings but the game will be playable.
dgVoodoo has many settings you can further experiment with to get the best results for your computer if needed.
Getting the Autorun/Game Launcher to Work
You only need to follow this step if you are experiencing problems with The Sims game launcher, which traditionally opens automatically every time you insert a disc to help you get the game installed or launch it.
On some newer devices, this can cause a problem where nothing happens or you get an error message from windows saying something needs to close. If you are unable to get the launcher working, try the following steps.
- Insert The Sims disc and go into This PC/My Computer
- Right click on the DVD Drive and click open

- Right click on start.exe and go to properties
- Under the Compatibility tab, tick the box beside “Run this program in compatibility mode for:” and select “Windows XP (Service Pack 3)”
- Press OK to save your settings

- Try relaunching The Sims 1 game launcher – you may find the Windows User Account Control will pop up asking for permission to open the file.

Manually Launching Setup / Setup is Not Starting
If you are trying to launch the setup to install the game and nothing is happening, or the autorun/game launcher is still not working, then the following section will help you.
- Go to This PC/My Computer
- Right click on the DVD Drive and click open in new window.

- Double click on the Setup folder
- Right click on Setup.exe and Run as administrator
- The Setup should now open and allow you to install the game – repeat this for every expansion you install

Setup having trouble shutting down autoplay program
If you get the following error appear when you try to launch the setup file, this is because the game launcher (start.exe) is running in the background, even if it hasn’t launched itself on your screen.

To fix this, open task manager, go to “processes”, find “start.exe” and end the task.
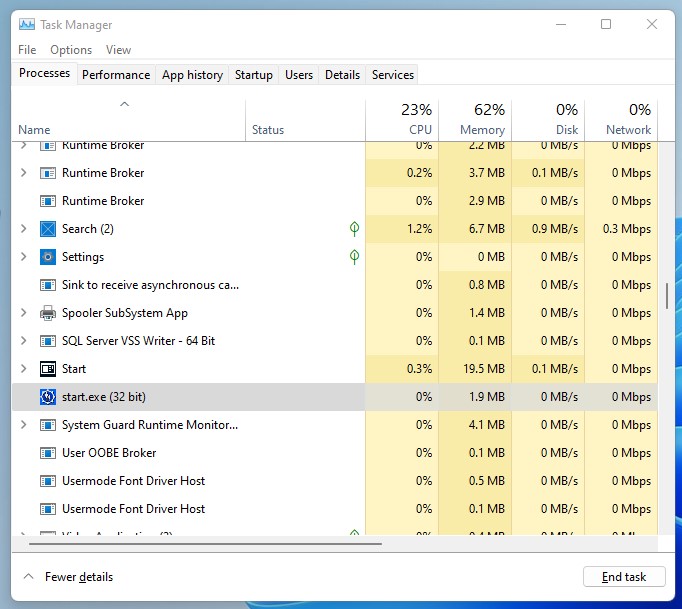
If you re-launch the setup, it should now work as expected.
InstallShield iKernel.exe Error
If you get the InstallSheild iKernel.exe error when you try to start installation of a Sims expansion, it’s a quick and easy fix.
- Go to C:\Program Files (x86)\Common Files
- Delete the InstallShield folder
- If it can’t be deleted because something is using it, restart your computer and repeat the above steps
- Try installing the expansion again – it should now work
Performance Issues/Crashes When Playing
If you are experiencing bad or varying levels of performance when playing The Sims, or perhaps it stops responding when you are playing, try the following tips:
Play in windowed mode – Whilst playing in full screen may be a more immersive experience, particularly as resolutions on newer devices are much larger than 1024×768, it can lead to lower frame rates and the game to run slower. By playing in windowed mode, this mostly seems to resolve itself and you should experience better performance.
Avoid clicking out of the game when loading – When you first launch The Sims, the game will go through quite a few screens to setup things like other neighbourhoods, magic, pets, etc. Whilst it’s tempting to leave this running in the background to complete, if you are playing in windowed mode, it may freeze and stop responding!
To stop this, avoid clicking out of the game when it is loading and make sure you keep The Sims open. This should prevent the game from crashing on most occasions. And, as always, SAVE REGULARLY!!
I need to try this. I miss playing Sims 1 so much even though I have 2, 3, and 4
Hopefully it helps you get playing TS1 again! It’s always great fun!
I tried this, it still is not working… help please! Thank you. Catherine
So I’ve tried installing the sims and It loads, then an error message comes up saying “Remote Procedure Call Failed”. This is bizarre because The installation and running of the game worked without a hitch before, on the same system, which runs on Windows 10.
That is very strange – perhaps one of the recent Windows 10 updates has caused it to have a hiccup? Have you tried the usual things such as Compatibility Mode, Running as Administrator, etc?
Does anyone know if the patch will work without all of the packs?
Hey there, the patch only works with all expansions installed (or The Sims Complete Collection). Apologies!
I can’t find the start properties menu. When I right click the DVD drive and click open it takes me to the start screen, not the setup folder.
I think your Windows settings can affect that sometimes. Are you definitely selecting the correct item on the menu?
THANK you SO much! I absolutely LOVE The Sims and can’t wait to give this a try. I really appreciate it.
No problem at all Heather! I hope you are able to get it working and have the best time playing!
I followed all the steps and everything seemed fine but after I click play on the launcher, nothing happens. It just doesn’t load up. I’ve tried the troubleshooting options, but still nothing.
Same
That’s really peculiar. A few things to consider trying that come to mind…
Unfortunately as it’s an older game running on newer software/hardware, there may be times where it’s difficult to get it to launch.
Hi again – the tutorial has been recently updated to accommodate for Windows 11 and other common problems. It may be worth checking out again incase any new info helps 🙂
this was happening for me when i first downloaded the game. it seems like anything i tried in this post just prevented the launch screen from showing up too. no errors. no nothing just silence whenever i try to start the game.
also if you need to uninstall the game use revouninstaller
thank you so much, i have read several things and none worked until i read this!
I’m so glad to hear that the tutorial has helped you get The Sims 1 working! Have a fab time playing!!
Hi Mercedes, may I ask which pc you have. I want to get a pc that’s compatible.
Just bought a Lenvor Computer with windows 11 and it won’t run my CD to download my Sims game.
Have you tried the compatibility settings to allow the setup.exe to run?
The auto run on the disc can be quite temperamental.
Thank you! It worked perfectly.
Hi Jeroen, which pc do you own? I want to buy one to play sims1 but don’t want to buy one that isn’t compatible
Hey there, this is a long message, I apologize ahead of time but, I need help!…
So, I have an original Sims Complete Collection w/ Sims Creator (the red one). I haven’t played in years due to not having a computer to do so, but I have loved this game ever since the very first Sims came out, I was like 12. Anyway, I have been following your steps to put install it on my Lenovo w/Windows 11. Maybe its just me but I am having some issues. (I have to use an external disc drive). It reads and installs the game without issues but I dont know how to move it into the C: drive in order to do the rest of the steps. It tells me that its downloading into the C: drive but then I cannot find it when I search/look for it, just that its in the D: drive. (Im not very computer savvy, can I move it manually?). Anyway, at first I was getting the admin issue. I adjusted the compatability and the admin issue doesn’t pop up anymore but now it doesn’t launch the actual Sims game after I select 800×600 or 1024×768 but it will launch The Sims Creator, even when I try to run as admin. My next issue is downloading “the new Sims.exe” as explained above. I download it then receive a message that says, “Fatal Error – Could not find the Sims data directory,” when I open it… Thats all I can think of right now even though I think there is a couple other things. I don’t know what else to do. I hope this is not a serious issue and I really hope you can help me figure it out. Please and thank you Dan.
Nevermind, I got it!!!!!
what did you do lol? i have the fatal error message as well
Omg what did you do?! I need help with the same issue 😭
I have done everything above and my game will not launch. I’m at a loss 😭 please help!
Me too! Does this only work on PC? Mine is a laptop…
Same for me unfortunately. It seems like the “signal” to start from the launcher never reaches my PC. I hope it’s understandable what I mean, English isn’t m first language…
Hi Dan! I’m so glad you posted this – it has helped a bunch so far since I have encountered numerous problems already just trying to install my new sims CD on a Windows 10 PC. Question for you though – I downloaded the Saria youtuber patch but realized it only works for the Complete Collection.
As I have The Sims Deluxe Edition only, are you aware of any other patches I can download that will allow me to launch my disc? As others have indicated, I also have the problem where I click “Play” > “1024×768” (and the “800×600”) under different compatibilities and nothing appears to work. I thought the youtuber’s patch might work but because I don’t actually have any expansion packs, it isn’t doing anything for me. Any advice is sincerely appreciated. Thank you!
Hey Clara, I am yet to come across any other patches unfortunately. Though, I have added a new “Windows 11 Fix / Game not launching” section which may help as a workaround.
I should add, we do have some patches for the original Sims games that may also help which includes the Deluxe Edition: https://beyondsims.com/games/sims-1/downloads/
[…] View complete answer on beyondsims.com […]
Recieving Fatal Error: could not find sims data directory message no matter what I try. I have gotten this exact file of the game to work before on windows 10. not sure what to do as the answers online are from 2003.
Starts up then crashes immediately ):
When i try and do the setup, it just comes with and error “Error getting the language from the registry”
any fix for this?
i own the sims complete collection and everything worked perfectly fine, i got it all installed, but i can’t play the game. none of the applications worked, i’ve tried both 800×600 and 1024×765, i’ve tried opening it with the start application in thesims_complete folder, i’ve tried opening it with the setup exe after i had everything installed, but none of it even attempts to open. the only thing i can get to work is the sim creator. i don’t know what else to try, i’ve checked compatibility with everything and done troubleshooting but nothing fixed the problem.
i just tried the windows 11 fix cause i missed it before, it didn’t fix the problem though. i’m on windows 10 so that may be why.
Hey Phee, sorry to hear that you seem to be having issues despite the troubleshooting steps I’ve tried to put together. The new fix solved it for me so was hoping it could be the same for all. It can really depend on the hardware and software you’re running it on – I had luck with the “Windows 11 Fix” troubleshooting step, that would also work on Windows 10. I’d recommend trying the optional patch too, if you haven’t yet. I know people have had issues getting it working all the way back to Windows 7, so it can be a game of luck sadly.
Another alternative could be to purchase a secondhand retro laptop with Windows Vista/XP on, or creating a virtual machine to run an older version of Windows for The Sims 1 – but that can be complicated!
Hi There,
I am having major issues just installing the game. I have the original CD and when I try to run the setup.exe in compatibility mode on windows 11 it just does not open anything. I tried all of your instructions to no avail. Can you please help?
Tried the djvoodoo graphic card fix and it didn’t work…Still says fatal error, that my graphic card can’t handle the colours….Anyone have fix for this?
How would I install the sims 3 on windows 11?
Hi Dan,
I’ve got it downloaded and running fine, but no mouse cursor is displaying when in full screen. I’ve got the windowed mode going but it’s like 1/5th of the size of my screen and so small! Any ideas?
Do you have a 4K screen, Peyton? The maximum resolution is 1024×768 though the game often launches in 800×600 too. Id recommend trying reducing your resolution if playing in windowed mode.
Completed all of the steps I can (including the djvoodoo ones but not Step 2 since I only have Triple Deluxe) but still can’t get this to run on a Windows 11 laptop. The game seemingly installs fine but will not actually open.
same!!
same
I can’t add the files for windows compatibility because it says there’s no space on the file left. Do you know what to do here?
This worked flawlessly for me, thank you SO much!
I’m thrilled to hear it helped!
Can you use The Sims Complete Collection in place of the individual expacs?
Oh my god I read the instructions too fast please ignore this lol.
Thank you! It all still works 🙂
Thank you so so much!! When I heard the music and started to play I legit almost cried. Brought back a lot of memories for me!!
How to find the serial number from the “back of your CD -ROM case”???
There is perceptibly a bunch to know about this. I consider you made certain good points in features also.
Друзья! Ищете лучший ресурс с целью развлечений? Вашему вниманию 1xslots casino скачать — платформа, в которой каждый отыщет что-то для себя.
Преимущества:
? Широкий выбор игр.
? Особенные бонусы для новичков и постоянных игроков.
? Безопасность и комфорт на высшем уровне.
Легко зайдите по ссылке и начните игру моментально!
Зачем терять время? Начните вашу развлечение прямо сейчас а также насладитесь уникальным игровым процессом!
Whoa! This blog looks exactly like my old one! It’s on a completely different subject but it has pretty much the same layout and design. Great choice of colors!
The next time I read a blog, I hope that it doesnt disappoint me as a lot as this one. I imply, I do know it was my option to read, but I truly thought youd have one thing fascinating to say. All I hear is a bunch of whining about one thing that you would fix for those who werent too busy looking for attention.
I like this site very much so much superb info .
I like this web site its a master peace ! Glad I observed this on google .
F*ckin’ awesome issues here. I’m very satisfied to peer your article. Thanks so much and i’m looking forward to contact you. Will you kindly drop me a e-mail?
I have been reading out a few of your stories and it’s pretty clever stuff. I will make sure to bookmark your blog.
I really like your writing style, great information, regards for posting :D. “Nothing sets a person so much out of the devil’s reach as humility.” by Johathan Edwards.
Very interesting details you have mentioned, appreciate it for posting. “You bluffed me I don’t like it when people bluff me. It makes me question my perception of reality.” by Andrew Schneider.
Pretty! This was a really wonderful post. Thank you for your provided information.
Great tremendous issues here. I am very glad to see your article. Thank you so much and i’m taking a look ahead to touch you. Will you kindly drop me a mail?
Wonderful work! This is the type of info that should be shared across the web. Disgrace on the search engines for now not positioning this submit upper! Come on over and discuss with my site . Thank you =)
Very interesting points you have mentioned, thankyou for putting up. “Opportunities are seldom labeled.” by John H. Shield.
I’d have to examine with you here. Which is not one thing I usually do! I get pleasure from reading a put up that may make people think. Also, thanks for permitting me to remark!
Your place is valueble for me. Thanks!…
Do you have a spam issue on this website; I also am a blogger, and I was wondering your situation; many of us have developed some nice methods and we are looking to exchange methods with other folks, be sure to shoot me an e-mail if interested.
Hiya, I am really glad I’ve found this info. Nowadays bloggers publish only about gossips and web and this is really annoying. A good site with exciting content, this is what I need. Thank you for keeping this site, I’ll be visiting it. Do you do newsletters? Can not find it.
You are a very capable individual!
Awsome post and right to the point. I am not sure if this is truly the best place to ask but do you guys have any ideea where to get some professional writers? Thanks 🙂
Greetings! Very helpful advice on this article! It is the little changes that make the biggest changes. Thanks a lot for sharing!
Some genuinely terrific work on behalf of the owner of this site, absolutely outstanding written content.
I am not real superb with English but I line up this really easygoing to understand.
I just like the valuable information you supply for your articles. I’ll bookmark your weblog and take a look at again here regularly. I’m slightly sure I’ll be told a lot of new stuff right right here! Best of luck for the next!
Great post. I was checking continuously this blog and I’m impressed! Extremely helpful information specially the last part 🙂 I care for such info a lot. I was seeking this particular information for a very long time. Thank you and good luck.
Greetings! Very helpful advice on this article! It is the little changes that make the biggest changes. Thanks a lot for sharing!
I respect your work, appreciate it for all the good blog posts.
Some really excellent info , Glad I detected this. “I have to be myself , I can’t be no one else…” by Noah Gallagher.
I have been surfing online more than 3 hours nowadays, but I never found any interesting article like yours. It’s lovely value sufficient for me. In my view, if all website owners and bloggers made just right content material as you did, the web will probably be much more helpful than ever before. “Dreams have as much influence as actions.” by Stephane Mallarme.
Greetings! I know this is kinda off topic but I was wondering which blog platform are you using for this site? I’m getting fed up of WordPress because I’ve had problems with hackers and I’m looking at options for another platform. I would be awesome if you could point me in the direction of a good platform.
I¦ll right away seize your rss as I can not find your email subscription link or newsletter service. Do you’ve any? Please permit me know in order that I may just subscribe. Thanks.
Do you mind if I quote a few of your posts as long as I provide credit and sources back to your weblog? My blog site is in the exact same niche as yours and my visitors would really benefit from a lot of the information you provide here. Please let me know if this alright with you. Appreciate it!
Simply want to say your article is as amazing. The clarity in your post is just spectacular and i could assume you are an expert on this subject. Fine with your permission let me to grab your feed to keep updated with forthcoming post. Thanks a million and please continue the enjoyable work.
We’re a bunch of volunteers and opening a brand new scheme in our community. Your web site offered us with valuable information to work on. You have done an impressive task and our entire community will probably be thankful to you.
I’ve been absent for a while, but now I remember why I used to love this website. Thanks, I’ll try and check back more frequently. How frequently you update your site?
No matter if some one searches for his required thing, so he/she desires to be available that in detail,
so that thing is maintained over here.
I love your writing style genuinely loving this site.
Друзья! Ищете лучший сайт с целью игры? Представляем вам 1xslots casino регистрация — платформа, где любой найдет интересное по душе.
Возможности:
? Обширный выбор развлечений.
? Особенные бонусы для новых пользователей а также опытных пользователей.
? Безопасность и удобство по высшему разряду.
Легко перейдите по ссылке и начните развлечение сразу же!
Почему тратить драгоценные минуты? Начните вашу развлечение сегодня же а также получите удовольствие уникальным игровым процессом!
Great info and straight to the point. I am not sure if this is truly the best place to ask but do you guys have any thoughts on where to get some professional writers? Thanks 🙂
Hello my loved one! I wish to say that this post is awesome, great written and come with almost all vital infos. I?¦d like to peer more posts like this .
Wow, awesome blog layout! How long have you been blogging for? you make blogging look easy. The overall look of your website is wonderful, let alone the content!
As a Newbie, I am continuously searching online for articles that can be of assistance to me. Thank you
Hello very nice blog!! Guy .. Beautiful .. Superb .. I’ll bookmark your web site and take the feeds also…I am happy to find so many helpful information right here in the put up, we’d like work out extra techniques in this regard, thank you for sharing.
Actually no matter if someone doesn’t understand then its
up to other visitors that they will assist, so here it
happens.
I reckon something really special in this web site.
Some truly wonderful info , Sword lily I observed this.
Incredible points. Great arguments. Keep up the amazing
effort.
fantastic post.Ne’er knew this, thankyou for letting me know.
Nice post. I was checking continuously this blog and I’m impressed! Extremely useful info particularly the last part 🙂 I care for such info a lot. I was looking for this particular information for a very long time. Thank you and best of luck.
Hi! Do you know if they make any plugins to help with Search
Engine Optimization? I’m trying to get my blog to rank for
some targeted keywords but I’m not seeing very
good results. If you know of any please share.
Appreciate it!
I just couldn’t depart your site before suggesting that I extremely enjoyed the standard information an individual provide for your guests? Is gonna be again often to investigate cross-check new posts.
Good day! I could have sworn I’ve been to this site before but after checking through some of the post I realized it’s
new to me. Nonetheless, I’m definitely glad I found it and I’ll be
book-marking and checking back often!
Greetings from Idaho! I’m bored at work so I decided to browse your blog on my iphone during lunch break. I enjoy the knowledge you present here and can’t wait to take a look when I get home. I’m surprised at how fast your blog loaded on my phone .. I’m not even using WIFI, just 3G .. Anyhow, wonderful blog!
Very interesting topic, thanks for putting up.
Simply wanna remark on few general things, The website layout is perfect, the articles is real great. “To the artist there is never anything ugly in nature.” by Franois Auguste Ren Rodin.
It¦s actually a great and useful piece of information. I¦m glad that you just shared this helpful info with us. Please keep us up to date like this. Thanks for sharing.
Normally I do not learn article on blogs, however I wish to say that this write-up very pressured me to check out and do it! Your writing taste has been surprised me. Thanks, quite great article.
Wonderful article! We will be linking to this particularly great content on our site.
Keep up the good writing.
Very nice design and great content material, absolutely nothing else we need : D.
Simply a smiling visitor here to share the love (:, btw great design.
Very nice post. I just stumbled upon your weblog and wanted to say that I have really enjoyed surfing around your blog posts. After all I will be subscribing to your rss feed and I am hoping you write once more very soon!
F*ckin’ awesome things here. I’m very satisfied to peer your article. Thanks a lot and i’m looking ahead to touch you. Will you kindly drop me a mail?
Absolutely pent subject matter, Really enjoyed looking at.
I don’t even know how I ended up here, but I thought this post
was good. I do not know who you are but definitely you are going to a famous blogger if you aren’t already 😉 Cheers!
I really appreciate this post. I have been looking all over for this! Thank goodness I found it on Bing. You’ve made my day! Thanks again
I was studying some of your content on this site and I conceive this internet site is really instructive! Keep on putting up.
Наряды оберегает от низких температур и зноя, но и подчеркивает стиль. Многие одеваются, чтобы выглядеть привлекательно. Многим важно, какое впечатление они производят, поэтому внешний вид становится инструментом самовыражения. Кроме того, правильно подобранный наряд помогает в нужной обстановке. К примеру, деловой костюм создает профессиональный вид, а свободная одежда идеальны для неформальных встреч. Как видно, стиль играет роль в каждодневных ситуациях.
http://www.pronews48.ru/list/104868
На этом сайте вы найдете клинику психологического здоровья, которая предоставляет психологические услуги для людей, страдающих от стресса и других психических расстройств. Мы предлагаем эффективные методы для восстановления психического здоровья. Врачи нашего центра готовы помочь вам преодолеть трудности и вернуться к гармонии. Профессионализм наших врачей подтверждена множеством положительных рекомендаций. Обратитесь с нами уже сегодня, чтобы начать путь к лучшей жизни.
http://fscal.com/__media__/js/netsoltrademark.php?d=empathycenter.ru%2Farticles%2Fgemofobiya-boyazn-vida-krovi%2F
Very good written article. It will be supportive to anyone who employess it, including yours truly :). Keep doing what you are doing – i will definitely read more posts.
Hiya! Quick question that’s totally off topic. Do you know how to make your site mobile
friendly? My website looks weird when browsing from my apple iphone.
I’m trying to find a template or plugin that might be able to resolve
this problem. If you have any recommendations, please share.
Many thanks!
Rattling fantastic information can be found on site. “Politics is applesauce.” by Will Rogers.
Hello my friend! I want to say that this post is amazing, nice written and include almost all significant infos. I¦d like to see extra posts like this .
An interesting discussion is worth comment. I think that you should write more on this topic, it might not be a taboo subject but generally people are not enough to speak on such topics. To the next. Cheers
I am very happy to read this. This is the type of manual that needs to be given and not the random misinformation that’s at the other blogs. Appreciate your sharing this greatest doc.
Hi, i think that i noticed you visited my blog thus i came to “return the want”.I am trying to to find issues to enhance my web site!I assume its good enough to use some of your ideas!!
I have read a few just right stuff here. Definitely worth bookmarking for revisiting. I surprise how much attempt you put to make one of these magnificent informative website.
I am really glad to glance at this blog posts which includes plenty of useful facts,
thanks for providing these kinds of statistics.
I wish to convey my love for your generosity giving support to individuals who must have help with this one area of interest. Your special dedication to getting the solution along turned out to be pretty insightful and has continuously allowed associates much like me to realize their objectives. The interesting guide implies much to me and much more to my colleagues. With thanks; from all of us.
What i do not realize is in reality how you are not really much more smartly-liked than you may be right now. You are so intelligent. You know therefore significantly on the subject of this subject, made me personally imagine it from so many varied angles. Its like women and men aren’t involved unless it is one thing to accomplish with Girl gaga! Your own stuffs great. All the time take care of it up!
Wow, fantastic blog layout! How lengthy have you been running a blog for? you made blogging glance easy. The full glance of your website is great, as neatly as the content material!
Здесь вы можете найти последние новости из автомобильной индустрии.
Мы обновляем контент регулярно, чтобы вы быть в курсе всех важных событий.
Автоновости охватывают разные стороны автомобильной жизни, включая новые модели, инновации и мероприятия.
http://www.rvktex.ru
Мы постоянно следим за всеми тенденциями, чтобы предоставить вам самую свежую информацию.
Если вы следите за автомобилями, этот сайт станет вашим лучшим другом.
Good site! I really love how it is easy on my eyes and the data are well written. I am wondering how I could be notified when a new post has been made. I have subscribed to your RSS which must do the trick! Have a nice day!
It’s actually a great and helpful piece of information. I’m glad that you shared this helpful information with us. Please keep us up to date like this. Thanks for sharing.
I was looking at some of your articles on this website and I conceive this website is real informative ! Continue posting.
As a Newbie, I am constantly exploring online for articles that can benefit me. Thank you
Howdy very cool web site!! Guy .. Beautiful .. Amazing .. I’ll bookmark your site and take the feeds additionally…I’m satisfied to find so many helpful information right here within the put up, we need develop extra techniques on this regard, thank you for sharing. . . . . .
Its fantastic as your other content : D, regards for posting. “I catnap now and then, but I think while I nap, so it’s not a waste of time.” by Martha Stewart.
I like this weblog so much, saved to bookmarks. “I don’t care what is written about me so long as it isn’t true.” by Dorothy Parker.
You actually make it appear so easy together with your presentation however I find this matter to be really something which I think I would by no means understand. It seems too complicated and extremely large for me. I’m taking a look forward for your next post, I?¦ll try to get the dangle of it!
I like this post, enjoyed this one regards for putting up. “The difference between stupidity and genius is that genius has its limits.” by Albert Einstein.
Good V I should certainly pronounce, impressed with your website. I had no trouble navigating through all the tabs and related info ended up being truly easy to do to access. I recently found what I hoped for before you know it in the least. Quite unusual. Is likely to appreciate it for those who add forums or anything, site theme . a tones way for your customer to communicate. Excellent task..
Play at Pin-Up Casino Canada
Looking for the best online casino experience in Canada? Pin-Up Casino is your top choice for big wins. Whether you’re a table games fan, Pin-Up Casino offers huge rewards to suit every taste.
Why Choose Pin-Up Casino?
Huge Selection of Games: Play top-quality slots from world-class developers.
Generous Bonuses and Promotions: Claim welcome bonuses to maximize your winnings.
Fast and Secure Payouts: Experience quick withdrawals with complete peace of mind.
Mobile-Friendly Gaming: Play anytime, anywhere on your phone or tablet.
24/7 Support: Get expert assistance from the Pin-Up Casino support team whenever you need it.
How to Get Started at Pin-Up Casino Canada?
Sign Up: Visit the Pin-Up Casino website and register in minutes.
Claim Your Bonus: Take advantage of free spins.
Explore the Games: Discover all your favorite casino games.
Start Playing and Winning: Spin the reels, place your bets, and win big.
Top Games Available at Pin-Up Casino Canada:
Slots: From progressive jackpot games to high-quality themed slots, there’s something for every player.
Table Games: Enjoy blackjack, roulette, baccarat, and poker.
Live Casino: Experience immersive live dealer games with professional dealers.
Why Pin-Up Casino is Canada’s Favorite Online Casino?
Pin-Up Casino combines secure gaming to create the ultimate destination for Canadian players. With live dealer options, it’s no wonder Pin-Up is a leading online casino.
Don’t Miss Out – Start Winning at Pin-Up Casino Canada!
Register and start playing at
pin-up
to win big jackpots and enjoy nonstop thrills!
I love it when people come together and share opinions, great blog, keep it up.
Throughout the grand scheme of things you’ll receive a B- with regard to effort. Where you lost me was on your facts. You know, as the maxim goes, details make or break the argument.. And it couldn’t be much more correct at this point. Having said that, let me tell you exactly what did give good results. Your article (parts of it) is certainly really convincing which is probably the reason why I am taking an effort to opine. I do not really make it a regular habit of doing that. 2nd, although I can see the leaps in reasoning you make, I am not really confident of how you appear to connect the points which inturn help to make the actual final result. For the moment I will subscribe to your point but trust in the near future you actually connect the dots much better.
Aumente o público das suas transmissões! Compre visualizações para live no YouTube e ganhe mais engajamento, credibilidade e alcance na plataforma.
you could have an ideal blog here! would you like to make some invite posts on my weblog?
I’m not that much of a online reader to be honest but your blogs really nice, keep it up! I’ll go ahead and bookmark your site to come back down the road. Cheers
Thank you for the good writeup. It in fact was a amusement account it. Look advanced to far added agreeable from you! However, how could we communicate?
I like this blog so much, saved to bookmarks. “American soldiers must be turned into lambs and eating them is tolerated.” by Muammar Qaddafi.
Hmm it looks like your site ate my first comment (it was super long) so I guess I’ll just sum it up what I wrote and say, I’m thoroughly enjoying your blog. I too am an aspiring blog writer but I’m still new to the whole thing. Do you have any points for first-time blog writers? I’d genuinely appreciate it.
Thanks for the sensible critique. Me and my neighbor were just preparing to do a little research on this. We got a grab a book from our area library but I think I learned more clear from this post. I am very glad to see such great information being shared freely out there.
Thank you for another informative blog. Where else could I get that type of information written in such an ideal way? I have a project that I’m just now working on, and I have been on the look out for such information.
VectorJet focuses on organizing private aircraft charters, collective flights, and logistics services.
They offer customized solutions for private jet flights, air taxis, helicopter flights, and freight delivery, including time-critical and emergency aid missions.
The company provides versatile travel options with individually tailored jet selections, constant management, and help with specific requests, such as animal-friendly travel or remote destination access.
Extra services feature aircraft leasing, transactions, and business aviation management.
VectorJet acts as an liaison between travelers and third-party operators, ensuring luxury, ease, and efficiency.
Their objective is to make private aviation accessible, reliable, and personally designed for each client.
vector-jet.com
Hi there, I log on to your blogs daily. Your story-telling
style is awesome, keep it up!
Mitolyn is a cutting-edge natural dietary supplement designed to support effective weight loss and improve overall wellness.
As I site possessor I believe the content matter here is rattling magnificent , appreciate it for your hard work. You should keep it up forever! Best of luck.
I savour, result in I discovered exactly what I was taking a look for.
You’ve ended my four day long hunt! God Bless you man. Have a great
day. Bye
The Natural Mounjaro Recipe is more than just a diet—it’s a sustainable and natural approach to weight management and overall health.
Mitolyn is a cutting-edge natural dietary supplement designed to support effective weight loss and improve overall wellness.
Hello all, here every one is sharing these know-how, thus it’s nice to read
this weblog, and I used to pay a visit this weblog everyday.
Hello there, just became aware of your blog through Google, and found that it is truly informative. I’m going to watch out for brussels. I’ll be grateful if you continue this in future. Numerous people will be benefited from your writing. Cheers!
PrimeBiome is a dietary supplement designed to support gut health by promoting a balanced microbiome, enhancing digestion, and boosting overall well-being.
ProstaVive is a dietary supplement designed to promote prostate health, support urinary function, and improve overall well-being in men, especially as they age.
Someone essentially help to make seriously posts I would state. This is the first time I frequented your web page and thus far? I amazed with the research you made to make this particular publish extraordinary. Excellent job!
Youre so cool! I dont suppose Ive learn something like this before. So nice to seek out someone with some original ideas on this subject. realy thank you for starting this up. this website is something that is wanted on the internet, someone with a little originality. helpful job for bringing something new to the web!
Very interesting details you have observed, thankyou for posting.
Thanks for a marvelous posting! I certainly enjoyed reading it, you are a great author.I will ensure that I bookmark your blog and may come back in the foreseeable future. I want to encourage one to continue your great job, have a nice holiday weekend!
I got what you mean , thanks for putting up.Woh I am glad to find this website through google. “Being intelligent is not a felony, but most societies evaluate it as at least a misdemeanor.” by Lazarus Long.
It’s the best time to make some plans for the future and it’s time to be happy. I’ve read this post and if I could I desire to suggest you some interesting things or tips. Maybe you can write next articles referring to this article. I desire to read more things about it!
I’ve been absent for a while, but now I remember why I used to love this site. Thanks, I?¦ll try and check back more frequently. How frequently you update your site?
Aw, this was a really nice post. In idea I wish to put in writing like this moreover – taking time and precise effort to make a very good article… but what can I say… I procrastinate alot and certainly not seem to get one thing done.
Транспортировка грузов в Минске — выгодное решение для организаций и частных лиц.
Мы организуем транспортировку по городу и региона, работая каждый день.
В нашем транспортном парке современные грузовые машины разной грузоподъемности, что помогает учесть любые запросы клиентов.
Перевозки Минск
Мы помогаем переезды, транспортировку мебели, строительных материалов, а также компактных посылок.
Наши водители — это профессиональные эксперты, хорошо знающие маршрутах Минска.
Мы гарантируем быструю подачу транспорта, осторожную погрузку и разгрузку в точку назначения.
Подать заявку на грузоперевозку можно через сайт или по звонку с консультацией.
Im no longer sure the place you’re getting your information, but good topic. I needs to spend a while learning much more or figuring out more. Thanks for fantastic info I used to be on the lookout for this information for my mission.
I like this web blog so much, saved to bookmarks. “Respect for the fragility and importance of an individual life is still the mark of an educated man.” by Norman Cousins.
Fantastic web site. A lot of useful info here. I’m sending it to several pals ans also sharing in delicious. And certainly, thanks to your effort!
I got what you mean ,bookmarked, very decent website .
I consider something genuinely special in this web site.
obviously like your website but you need to take a look at the spelling on quite a few of your posts. A number of them are rife with spelling issues and I to find it very troublesome to tell the truth on the other hand I will certainly come again again.
Deference to website author, some good selective information.
Does your blog have a contact page? I’m having trouble locating it but, I’d like to send you an e-mail. I’ve got some suggestions for your blog you might be interested in hearing. Either way, great website and I look forward to seeing it improve over time.
Make memories with Miami limo rentals. Whether it’s a wedding limo service Miami, bachelorette party limo Miami, or prom night limo Miami, we provide Hummer limo rental Miami, SUV limo rental Miami, and birthday limo rental Miami for a luxurious ride.
Hello. remarkable job. I did not imagine this. This is a splendid story. Thanks!
I like this site very much so much great information.
Game Athlon is a renowned gaming site offering thrilling games for gamblers of all preferences.
The casino features a diverse collection of slot machines, live casino tables, table games, and sportsbook.
Players are offered smooth navigation, stunning animations, and user-friendly interfaces on both PC and smartphones.
http://www.gameathlon.gr
GameAthlon focuses on security by offering trusted payment methods and transparent outcomes.
Bonuses and VIP perks are constantly improved, giving players extra opportunities to win and extend their play.
The helpdesk is available 24/7, helping with any issues quickly and professionally.
GameAthlon is the perfect place for those looking for an adrenaline rush and big winnings in one safe space.
The heart of your writing whilst appearing agreeable at first, did not really work very well with me after some time. Somewhere within the sentences you were able to make me a believer but just for a short while. I however have a problem with your leaps in assumptions and one would do nicely to fill in those gaps. In the event that you can accomplish that, I will definitely end up being fascinated.
Step up your party game with the Best Bachelorette Party Bus Miami! With VIP access and a Miami Bachelorette Party Bus with Stripper Pole, we guarantee a fun-filled night on the town.
Maryland’s top choice for group transportation, the charter bus service offers motor coaches for seamless travel across Maryland and DC. Specializing in accommodating groups, they provide reliable motor coach transportation for efficient and comfortable journeys throughout the region.
Airport transfer Bahamas offer affordable shuttles to deluxe executive sedans, we’ve got you covered on pretty much everything. So when you are in Bahamas and you looking for any transfer contact us we will give you the best option for your destination
Airporttransfernassau.com is the place to find Nassau Airport to Warwick Paradise Island transportation and rates. We offer safe, reliable, and professional transportation services from Nassau Airport to Warwick Paradise Island for all your needs!
Bahamas Premium Transfers is proud to serve private transportation from Nassau Airport to Rosewood Baha Mar with professional cheuffeur.
Our Niagara Falls airport transfer service offers convenient transportation options to Toronto Pearson, Buffalo, and Hamilton Airports. We provide private and efficient transfers, including shuttles and car services, for a smooth journey from Niagara Falls to your destination.
Choose Airport Limo with Car Seat Toronto for a luxury and secure ride. Our Safe Airport Taxi for Kids Toronto guarantees comfort for young passengers. With a Taxi with Car Seat from Toronto Pearson Airport and Toronto Pearson Airport Minivan Taxi with Car Seat, families can travel worry-free, knowing their children are protected.
Enjoy a smooth experience with Toronto Airport Hotels with Shuttle Services. Book a 24/7 Airport Shuttle Service to Toronto Hotels or opt for a Shuttle from Toronto Airport to Downtown Hotels. Whether choosing Free Airport Shuttle Hotels Toronto Pearson or a Private Car Service from Toronto Airport to Hotels, experience stress-free transportation.
Travel from Dubai Airport to Atlantis The Palm in 30-45 minutes over 30 kilometers. Taxis are a straightforward option, while a limo service brings an elevated experience for your stay.
Experience luxury chauffeur services Dubai with professional drivers catering to your needs. From Dubai Airport chauffeur service to chauffeur service from Dubai Airport to Burj Khalifa, we provide seamless transfers. Whether for business or leisure, our reliable chauffeur service Dubai ensures elegance, comfort, and punctuality in every ride.
you are traveling for business or leisure, arriving on time for your flight is made easy with Rolls royce airport transfers from Airport Transfers Dubai
Streamline your travel with our O’Hare Airport Pickup/Drop Service. Enjoy hassle-free transportation with our reliable shuttle, limousine, and chauffeur options. From airport transfers to downtown journeys, we ensure comfort and convenience.
Get to Ontario Airport smoothly with our Shuttle to Ontario Airport. Our service includes convenient rides from Los Angeles, Orange, Riverside, and San Bernardino Counties, with pickups available from Rancho Cucamonga, Fontana, and Riverside for added convenience.
Book an affordable Airport Shuttle from IAH to Galveston for smooth, convenient transportation. Whether you’re heading to Galveston hotels, the cruise terminal, or other locations, our IAH to Galveston Shuttle Service offers a reliable, hassle-free travel experience.
I enjoy assembling useful info, this post has got me even more info! .
I saw a lot of website but I think this one contains something special in it in it
Somebody essentially help to make seriously articles I would state. This is the very first time I frequented your website page and thus far? I amazed with the research you made to make this particular publish incredible. Wonderful job!
Some genuinely nice and useful info on this site, besides I think the style has fantastic features.
Lovely just what I was searching for.Thanks to the author for taking his clock time on this one.
Hello. excellent job. I did not imagine this. This is a fantastic story. Thanks!
As I web-site possessor I believe the content material here is rattling wonderful , appreciate it for your hard work. You should keep it up forever! Best of luck.
I love your blog.. very nice colors & theme. Did you create this website yourself or did you hire someone to do it for you? Plz reply as I’m looking to design my own blog and would like to know where u got this from. appreciate it
Wow that was unusual. I just wrote an extremely long comment but after I clicked submit my comment didn’t show up. Grrrr… well I’m not writing all that over again. Anyways, just wanted to say superb blog!
Good info. Lucky me I reach on your website by accident, I bookmarked it.
Mitolyn is a cutting-edge natural dietary supplement designed to support effective weight loss and improve overall wellness.
certainly like your web-site but you have to check the spelling on several of your posts. A number of them are rife with spelling problems and I to find it very bothersome to inform the truth however I will certainly come again again.
Mitolyn is a cutting-edge natural dietary supplement designed to support effective weight loss and improve overall wellness.
I have been exploring for a bit for any high quality articles or blog posts on this sort of house . Exploring in Yahoo I eventually stumbled upon this website. Studying this information So i’m happy to express that I have an incredibly just right uncanny feeling I found out exactly what I needed. I such a lot unquestionably will make sure to don’t fail to remember this site and give it a look on a continuing basis.
Hi there very nice web site!! Man .. Excellent .. Superb .. I will bookmark your site and take the feeds additionally…I’m glad to find a lot of helpful info here within the post, we want develop more strategies in this regard, thank you for sharing. . . . . .
Предлагаем услуги проката автобусов и микроавтобусов с водителем большим организациям, малого и среднего бизнеса, а также частным лицам.
Качественный автопарк для аренды
Обеспечиваем комфортную и безопасную доставку для групп людей, организуя транспортные услуги на торжества, корпоративные встречи, туристические поездки и разные мероприятия в регионе Челябинска.
Everything is very open and very clear explanation of issues. was truly information. Your website is very useful. Thanks for sharing.
PrimeBiome is a dietary supplement designed to support gut health by promoting a balanced microbiome, enhancing digestion, and boosting overall well-being.
I really enjoy reading on this website , it has got good blog posts.
I am not rattling fantastic with English but I get hold this very easy to understand.
PrimeBiome is a dietary supplement designed to support gut health by promoting a balanced microbiome, enhancing digestion, and boosting overall well-being.
PrimeBiome is a dietary supplement designed to support gut health by promoting a balanced microbiome, enhancing digestion, and boosting overall well-being.
It?¦s really a great and helpful piece of info. I?¦m glad that you simply shared this useful info with us. Please stay us informed like this. Thank you for sharing.
very good publish, i definitely love this website, keep on it
Rattling instructive and excellent structure of subject matter, now that’s user friendly (:.
Swiss watches have long been a gold standard in horology. Crafted by renowned artisans, they combine heritage with modern technology.
All elements reflect superior workmanship, from hand-assembled movements to high-end finishes.
Wearing a horological masterpiece is not just about telling time. It stands for refined taste and exceptional durability.
No matter if you love a classic design, Swiss watches deliver extraordinary beauty that stands the test of time.
https://www.balkan-nation.com/forum/index.php?topic=3466.new#new
Its like you read my mind! You appear to know so much about this, like you wrote the book in it or something. I think that you can do with some pics to drive the message home a bit, but other than that, this is fantastic blog. An excellent read. I’ll certainly be back.
The Natural Mounjaro Recipe is more than just a diet—it’s a sustainable and natural approach to weight management and overall health.
Wonderful website. Lots of useful info here. I’m sending it to several friends ans also sharing in delicious. And certainly, thanks for your sweat!
Nitric Boost Ultra is a dietary supplement designed to enhance cardiovascular health, energy levels, and endurance by increasing nitric oxide (NO) production in the body.
F*ckin’ awesome things here. I’m very happy to look your article. Thank you a lot and i am looking forward to touch you. Will you kindly drop me a e-mail?
Hello. splendid job. I did not anticipate this. This is a impressive story. Thanks!
Mitolyn is a cutting-edge natural dietary supplement designed to support effective weight loss and improve overall wellness.
Simply wish to say your article is as amazing. The clarity for your submit is simply spectacular and i can suppose you’re an expert in this subject. Well together with your permission allow me to clutch your RSS feed to stay up to date with drawing close post. Thank you 1,000,000 and please continue the enjoyable work.
I’d need to verify with you here. Which is not one thing I usually do! I enjoy reading a submit that will make people think. Also, thanks for permitting me to remark!
PrimeBiome is a dietary supplement designed to support gut health by promoting a balanced microbiome, enhancing digestion, and boosting overall well-being.
great publish, very informative. I ponder why the other specialists of this sector don’t notice this. You should proceed your writing. I am confident, you’ve a great readers’ base already!
ProDentim is a cutting-edge oral health supplement designed to improve dental and gum health by leveraging natural probiotics and nutrientes.
The Natural Mounjaro Recipe is more than just a diet—it’s a sustainable and natural approach to weight management and overall health.
https://dissertation-now.com/essayassist-com/
I really like your blog.. very nice colors & theme. Did you make this website yourself or did you hire someone to do it for you? Plz reply as I’m looking to construct my own blog and would like to find out where u got this from. appreciate it
What i do not realize is actually how you’re not actually much more well-liked than you might be now. You’re very intelligent. You realize therefore significantly relating to this subject, made me personally consider it from a lot of varied angles. Its like women and men aren’t fascinated unless it’s one thing to do with Lady gaga! Your own stuffs nice. Always maintain it up!
Сертификация на территории РФ является важным процессом легальной реализации товаров.
Этот процесс подтверждает соответствие государственным стандартам и правилам, а это гарантирует защиту потребителей от фальсификата.
обязательная сертификация
Также официальное подтверждение качества облегчает взаимодействие с заказчиками и открывает перспективы в предпринимательской деятельности.
При отсутствии сертификатов, может возникнуть проблемы с законом и ограничения при ведении бизнеса.
Поэтому, получение сертификатов является не просто обязательным, но и важным фактором для успешного развития компании в России.
Прохождение сертификации в нашей стране по-прежнему считается ключевым процессом легальной реализации товаров.
Этот процесс обеспечивает соответствие установленным требованиям техническим регламентам и официальным требованиям, что, в свою очередь, оберегает конечных пользователей от некачественных товаров.
сертификация
К тому же, наличие сертификатов способствует деловые отношения с крупными ритейлерами и повышает перспективы для бизнеса.
Если продукция не сертифицирована, не исключены штрафы и барьеры при продаже товаров.
Таким образом, оформление документации является не просто обязательным, но и важным фактором устойчивого роста организации в сфере торговли.
I am curious to find out what blog system you have been utilizing? I’m experiencing some small security problems with my latest blog and I would like to find something more safeguarded. Do you have any recommendations?
Real superb info can be found on site. “I know of no great men except those who have rendered great service to the human race.” by Francois Marie Arouet Voltaire.
Regardless of the popularity of digital timepieces, classic wristwatches continue to be everlasting.
Many people still appreciate the intricate design that defines classic automatics.
Compared to modern wearables, which lose relevance, mechanical watches hold their value through generations.
https://zapp.red/myforum/topic/do-high-end-watches-worth-the-investment/#postid-182712
Luxury brands are always introducing exclusive mechanical models, confirming that demand for them remains strong.
For true enthusiasts, a mechanical watch is not just an accessory, but a reflection of heritage.
Even as high-tech wearables provide extra features, mechanical watches have soul that remains unmatched.
Wow! This can be one particular of the most useful blogs We have ever arrive across on this subject. Actually Magnificent. I’m also an expert in this topic therefore I can understand your hard work.
you’re really a good webmaster. The website loading speed is incredible. It seems that you are doing any unique trick. Furthermore, The contents are masterwork. you’ve done a excellent job on this topic!
Magnificent web site. Lots of useful info here. I’m sending it to several buddies ans additionally sharing in delicious. And naturally, thank you to your sweat!
This is very attention-grabbing, You’re an excessively skilled blogger. I’ve joined your feed and look forward to seeking extra of your excellent post. Additionally, I have shared your website in my social networks!
As soon as I found this internet site I went on reddit to share some of the love with them.
You really make it seem so easy along with your presentation however I to find this topic to be actually one thing which I feel I’d by no means understand. It sort of feels too complicated and extremely broad for me. I’m looking forward for your next submit, I¦ll attempt to get the grasp of it!
Very interesting info !Perfect just what I was searching for!
I’m typically to running a blog and i actually admire your content. The article has really peaks my interest. I’m going to bookmark your website and keep checking for brand new information.
Keep up the wonderful work, I read few content on this site and I conceive that your web site is real interesting and has got circles of excellent info .
I like this web site so much, saved to my bookmarks.
I have been exploring for a bit for any high quality articles or weblog posts in this kind of area . Exploring in Yahoo I eventually stumbled upon this website. Studying this info So i am satisfied to show that I have an incredibly good uncanny feeling I came upon just what I needed. I so much certainly will make sure to do not omit this website and give it a look on a relentless basis.
Rely on Brantford Airport Taxi & Shuttle Service for timely connections to Toronto Pearson, Hamilton, or Niagara Falls airports. Enjoy luxury limos, affordable taxis, and 24/7 shuttle service designed for your comfort.
Good day very cool site!! Man .. Beautiful .. Superb .. I will bookmark your website and take the feeds alsoKI am satisfied to search out a lot of helpful information right here in the put up, we’d like work out extra strategies on this regard, thanks for sharing. . . . . .
Make memories with a VIP Bachelorette Party Bus Miami! Experience the best Bachelorette Party Bus Rental Miami with luxury features and a professional chauffeur.
Arrive in luxury with Miami limo rentals. Whether it’s a bachelorette party limo Miami, sweet 16 limo Miami, or prom limo rental Miami, we have the perfect ride. Choose SUV limo rental Miami, stretch limo rental Miami, or luxury limo rental Miami for your big day.
Choose our Bus Service in Baltimore, Maryland, for exceptional Charter Bus Service and Group Transportation. Our Shuttle Bus Services, Motor Coach Bus rental, Wedding Transportation, and Airport Transfer options provide comfort and reliability, ensuring a smooth journey for all your travel needs.
Luxury SUV from Nassau Airport to Baha Mar ensures a comfortable journey. Opt for a limo from Nassau Airport to Baha Mar, an executive SUV transfer, or a stretch limo for added style. The best Nassau Airport transfer to Baha Mar guarantees punctuality and professionalism.
Nassau Airport to The Cove Atlantis – We’re excited to be able to provide professional transportation services from Nassau Airport to The Cove Atlantis and Paradise Island!
Choose our Luxury Airport Pickup Nassau for an exceptional VIP Airport Transfer Nassau. From Nassau Private Car Service to Exclusive Airport Pickup Nassau, travel in comfort with our Nassau Airport Limousine Service and enjoy elegant Nassau Airport transportation.
For seamless travel between Kingston and Toronto Pearson Airport, trust Kingston Taxi’s reliable service. Whether you prefer an airport shuttle or limo, we prioritize comfort and punctuality for your convenience.
Book a Toronto to Airport Taxi with Booster Seat for safe family transportation. Our Airport Taxi Car Seat Toronto ensures young passengers travel securely. Whether you need an Airport Transfer with Car Seat Toronto or a Safe Airport Taxi for Kids Toronto, our child-friendly services provide comfort and reliability for your journey.
We are a professional full-service transportation company and we provide the best party transportation in Abu dhabi, Sharjah, and Dubai.
Enjoy flexible Van Services Dubai, offering Reliable Van Services Dubai, Luxury Van Services Dubai, and Corporate Van Services Dubai for all transportation needs.
Travel with ease using Dubai Airport Transfer Service. We offer Private Airport Transfer Dubai, Executive Airport Transfer Dubai, and Luxury Limo Dubai Airport, providing a hassle-free airport transportation experience.
Little Stars Travel provides reliable airport transportation services in Dubai. With professional drivers and a versatile fleet, they ensure punctual and comfortable transfers to and from the airport. Whether for business or leisure, their services guarantee a hassle-free start or end to your journey in Dubai.
Elevate your airport experience with our comprehensive O’Hare Airport Pickup/Drop Service. Offering shuttle pickups, limousine transfers, and chauffeur-driven rides, we prioritize punctuality, professionalism, and comfort for every traveler’s needs.
Elevate your journey with our Black Luxury Car Service in Chicago. Offering executive sedans, black SUVs, and professional chauffeurs, we cater to your every transportation need. Experience luxury and convenience like never before with our premium black car service.
Black Tie Transport offers reliable shuttle service from Rancho Cucamonga to LAX, featuring affordable LAX shuttle options, private car services, and luxury transportation. With airport shuttle options, SUV transportation, and seamless Rancho Cucamonga airport transfers, choose Black Tie for a comfortable and efficient airport experience to LAX and beyond.
Houston to Galveston Brewery Tour Sprinter Van offers seamless and stylish group travel for brewery and winery tours. Enjoy spacious seating, luxury features, and a hassle-free ride with the best sprinter van rental.
Pretty! This was a really wonderful post. Thank you for your provided information.
Hey there! Do you know if they make any plugins to safeguard against hackers? I’m kinda paranoid about losing everything I’ve worked hard on. Any tips?
I am glad that I observed this site, exactly the right info that I was searching for! .
Ordering medicine online is far simpler than going to a physical pharmacy.
You don’t have to deal with crowds or worry about store hours.
Internet drugstores allow you to buy what you need without leaving your house.
Many platforms provide special deals in contrast to brick-and-mortar pharmacies.
http://foro.clubdellector.edhasa.es/viewtopic.php?f=6&t=1064505
On top of that, it’s possible to check different brands quickly.
Reliable shipping makes it even more convenient.
Have you tried ordering from e-pharmacies?
I have been absent for some time, but now I remember why I used to love this website. Thanks, I’ll try and check back more often. How frequently you update your web site?
На данном ресурсе можно найти свежие новости мировой политики. Ежедневные публикации помогают быть в курсе важных событий. Здесь освещаются дипломатических переговорах. Экспертные мнения позволяют оценить происходящее. Оставайтесь информированными вместе с нами.
https://justdoitnow03042025.com
Thanks for any other great article. The place else may just anybody get that kind of info in such a perfect manner of writing? I’ve a presentation next week, and I’m on the search for such info.
https://pq.hosting/help/krasivye-foto-prirody-dlja-rabochego-stola
Great website. Plenty of useful info here. I?¦m sending it to a few buddies ans additionally sharing in delicious. And certainly, thank you in your sweat!
На этом сайте можно найти свежие новости Краснодара.
Здесь собраны актуальные события города, репортажи и важные обновления.
Следите за развития событий и читайте информацию из первых рук.
Если вам интересно, что нового в Краснодаре, заглядывайте сюда регулярно!
https://krasnodar.rftimes.ru/
Thank you for the auspicious writeup. It in fact was a amusement account it. Look advanced to far added agreeable from you! However, how can we communicate?
Hi just wanted to give you a brief heads up and let you know a few of the pictures aren’t loading correctly. I’m not sure why but I think its a linking issue. I’ve tried it in two different browsers and both show the same outcome.
I got good info from your blog
I think this site has some really superb info for everyone. “There is nothing so disagreeable, that a patient mind cannot find some solace for it.” by Lucius Annaeus Seneca.
Valuable information. Lucky me I found your site by accident, and I’m shocked why this accident did not happened earlier! I bookmarked it.
Yay google is my queen helped me to find this great internet site! .
Здесь вам открывается шанс наслаждаться большим выбором игровых автоматов.
Игровые автоматы характеризуются живой визуализацией и интерактивным игровым процессом.
Каждый игровой автомат предоставляет уникальные бонусные раунды, улучшающие шансы на успех.
1win
Игра в игровые автоматы предназначена любителей азартных игр всех мастей.
Можно опробовать игру без ставки, и потом испытать азарт игры на реальные ставки.
Испытайте удачу и насладитесь неповторимой атмосферой игровых автоматов.
На данном ресурсе вы можете найти популярные слот-автоматы.
Мы предлагаем ассортимент автоматов от топ-разработчиков.
Каждый слот отличается интересным геймплеем, дополнительными возможностями и высокой отдачей.
https://healthdialogues.org/the-revolution-of-gaming-the-online-casino-experience-2/
Пользователи могут запускать слоты бесплатно или делать реальные ставки.
Интерфейс просты и логичны, что делает поиск игр быстрым.
Для любителей онлайн-казино, здесь вы точно найдете что-то по душе.
Присоединяйтесь прямо сейчас — возможно, именно сегодня вам повезёт!
На данном ресурсе вы можете найти различные игровые автоматы.
Мы предлагаем ассортимент слотов от ведущих провайдеров.
Каждая игра отличается высоким качеством, увлекательными бонусами и честными шансами на выигрыш.
https://www.lowongankerjas.com/demystifying-the-thrilling-world-of-online-casinos/
Пользователи могут тестировать автоматы без вложений или выигрывать настоящие призы.
Навигация по сайту просты и логичны, что делает поиск игр быстрым.
Если вы любите азартные игры, здесь вы точно найдете что-то по душе.
Присоединяйтесь прямо сейчас — тысячи выигрышей ждут вас!
I’d have to check with you here. Which is not something I normally do! I take pleasure in reading a submit that may make individuals think. Additionally, thanks for allowing me to comment!
Hello, Neat post. There is a problem along with your web site in internet explorer, would check thisK IE nonetheless is the market chief and a big component of other people will omit your wonderful writing due to this problem.
Can I just say what a relief to seek out someone who actually knows what theyre talking about on the internet. You definitely know how you can bring a problem to mild and make it important. Extra individuals have to read this and perceive this facet of the story. I cant believe youre no more widespread because you undoubtedly have the gift.
very nice submit, i certainly love this website, carry on it
На нашей платформе можно найти разнообразные слот-автоматы.
На сайте представлены лучшую коллекцию автоматов от топ-разработчиков.
Любой автомат предлагает высоким качеством, призовыми раундами и честными шансами на выигрыш.
https://peoples-state-bank.com/unveiling-the-excitement-and-opportunity-in-online-casinos/
Каждый посетитель может играть в демо-режиме или выигрывать настоящие призы.
Навигация по сайту интуитивно понятны, что облегчает поиск игр.
Если вас интересуют слоты, данный ресурс стоит посетить.
Начинайте играть уже сегодня — азарт и удача уже рядом!
Taking one’s own life is a tragic issue that affects millions of people across the world.
It is often associated with emotional pain, such as bipolar disorder, trauma, or substance abuse.
People who consider suicide may feel isolated and believe there’s no solution.
https://how-to-kill-yourself.com
We must talk openly about this topic and offer a helping hand.
Mental health care can make a difference, and reaching out is a necessary first step.
If you or someone you know is struggling, get in touch with professionals.
You are not forgotten, and support exists.
As soon as I detected this web site I went on reddit to share some of the love with them.
buy austria virtual phone number online https://virtual-local-numbers.com/countries/66-austria.html for calls, sms, registration (otp)
I genuinely value your work, Great post.
O Pix My Dollar é um aplicativo de microtarefas: você realiza atividades simples no celular e acumula recompensas, que podem ser convertidas em dinheiro.
Aw, this was a really nice post. In idea I would like to put in writing like this additionally – taking time and precise effort to make a very good article… however what can I say… I procrastinate alot and in no way seem to get one thing done.
Hi there just wanted to give you a quick heads up and let you know a few of the pictures aren’t loading correctly. I’m not sure why but I think its a linking issue. I’ve tried it in two different internet browsers and both show the same outcome.
O Pix My Dollar é um aplicativo de microtarefas: você realiza atividades simples no celular e acumula recompensas, que podem ser convertidas em dinheiro.
This website, you can find a great variety of online slots from top providers.
Visitors can enjoy classic slots as well as new-generation slots with stunning graphics and exciting features.
If you’re just starting out or a seasoned gamer, there’s something for everyone.
play aviator
All slot machines are available anytime and optimized for laptops and smartphones alike.
No download is required, so you can start playing instantly.
Platform layout is user-friendly, making it convenient to find your favorite slot.
Register now, and enjoy the excitement of spinning reels!
A person necessarily help to make seriously articles I’d state. This is the first time I frequented your web page and thus far? I surprised with the analysis you made to make this actual put up extraordinary. Excellent process!
Se você gosta de fazer compras online e quer pagar menos sem abrir mão da qualidade, o Cupom da Vez é a solução ideal!
My spouse and I stumbled over here by a different web address and thought I may as well check things out. I like what I see so i am just following you. Look forward to checking out your web page again.
I was studying some of your content on this internet site and I believe this web site is really informative! Retain putting up.
athen auto mieten
There is noticeably a bundle to learn about this. I assume you made sure nice factors in features also.
Good write-up, I¦m regular visitor of one¦s web site, maintain up the excellent operate, and It is going to be a regular visitor for a long time.
Undeniably consider that which you said. Your favorite justification seemed to be at the internet the simplest factor to remember of. I say to you, I certainly get irked at the same time as other people think about concerns that they just don’t understand about. You controlled to hit the nail upon the top as smartly as outlined out the entire thing without having side effect , folks could take a signal. Will probably be back to get more. Thanks
Useful information. Fortunate me I discovered your web site unintentionally, and I’m surprised why this accident did not happened in advance! I bookmarked it.
O Pix My Dollar é um aplicativo de microtarefas: você realiza atividades simples no celular e acumula recompensas, que podem ser convertidas em dinheiro.
I’m so happy to read this. This is the type of manual that needs to be given and not the random misinformation that’s at the other blogs. Appreciate your sharing this greatest doc.
I like your writing style truly loving this web site.
Very interesting info!Perfect just what I was searching for!
Some really superb posts on this internet site, thanks for contribution.
Hey, you used to write fantastic, but the last several posts have been kinda boring… I miss your great writings. Past few posts are just a little bit out of track! come on!
I truly enjoy looking at on this website , it holds great content.
I really appreciate this post. I have been looking all over for this! Thank goodness I found it on Bing. You’ve made my day! Thx again!
Thanks for the good writeup. It actually was a enjoyment account it. Glance complicated to far brought agreeable from you! However, how could we keep up a correspondence?
On this platform, you can discover lots of slot machines from leading developers.
Users can enjoy retro-style games as well as new-generation slots with high-quality visuals and exciting features.
Even if you’re new or a casino enthusiast, there’s something for everyone.
casino
The games are available round the clock and optimized for PCs and mobile devices alike.
No download is required, so you can get started without hassle.
Platform layout is user-friendly, making it simple to explore new games.
Sign up today, and enjoy the world of online slots!
Онлайн-площадка — сайт частного аналитической компании.
Мы предлагаем помощь по частным расследованиям.
Штат детективов работает с абсолютной осторожностью.
Мы берёмся за наблюдение и анализ ситуаций.
Заказать детектива
Любой запрос рассматривается индивидуально.
Опираемся на проверенные подходы и ориентируемся на правовые стандарты.
Нуждаетесь в ответственное агентство — добро пожаловать.
Предстоящее лето обещает быть стильным и инновационным в плане моды.
В тренде будут натуральные ткани и игра фактур.
Модные цвета включают в себя мягкие пастели, выделяющие образ.
Особое внимание дизайнеры уделяют тканям, среди которых популярны плетёные элементы.
https://play.eslgaming.com/player/myinfos/20415461/
Набирают популярность элементы ретро-стиля, через призму сегодняшнего дня.
В стритстайле уже можно увидеть трендовые образы, которые вдохновляют.
Следите за обновлениями, чтобы вписаться в тренды.
Looking for Medicaid planning attorneys in Ohio? This firm specializes in asset protection strategies.
Travel stress-free with airport taxi Brantford. Our Brantford to Pearson transportation includes limo Brantford, taxi Brantford to Toronto Airport, and YYZ airport car service with prompt, professional chauffeurs.
Secure timely transportation with Kingston Taxi Services, offering reliable taxi and airport shuttle options. Experience comfort and convenience with Kingston Airport Limo Service for a smooth journey to Pearson Airport.
Reliable and affordable Houston Hobby Airport to Galveston Shuttle service provides transportation to Galveston Cruise Port, Galveston Beach, Moody Gardens, Schlitterbahn, and the Strand, with private or shared shuttle options tailored to your travel needs.
Celebrate your birthday in luxury with a Birthday Party Bus Miami. This Luxury Party Bus Miami features top-of-the-line amenities like sound systems, LED lighting, and space for dancing. A DJ Party Bus Miami ensures a fun atmosphere while exploring Miami Nightlife and enjoying exclusive Party on Wheels Miami features.
Travel in comfort with Dubai chauffeur hire for airport pickups and city tours. From a meet and greet chauffeur service Dubai at the airport to chauffeur service to Dubai Airport from Global Village, we offer personalized, hassle-free rides with premium vehicles for an unmatched experience.
Enjoy an efficient Dubai Airport Pickup Service with professional drivers and well-maintained vehicles. Whether you choose Dubai Airport Private Pickup, DXB Airport Pickup, or a Dubai Airport Shuttle Service, we ensure a smooth and relaxing journey.
With Airport Transfers Bahamas, clients enjoy a luxury fleet that combines comfort and the utmost in vehicle safety. Our service offers an elite travel experience tailored to your needs.
Black Tie Transport provides top-notch shuttle services from Rancho Cucamonga to LAX. Their affordable LAX shuttle service, private car services, and luxury car options ensure a comfortable ride. With efficient SUV transportation and dependable Rancho Cucamonga airport transfers, their transportation services to LAX promise a smooth, hassle-free journey.
Онлайн-площадка — официальная страница независимого сыскного бюро.
Мы предоставляем услуги по частным расследованиям.
Команда детективов работает с повышенной этичностью.
Нам доверяют сбор информации и детальное изучение обстоятельств.
Нанять детектива
Любая задача рассматривается индивидуально.
Применяем новейшие технологии и работаем строго в рамках закона.
Если вы ищете реальную помощь — вы нашли нужный сайт.
On this platform, you can find a wide selection of casino slots from leading developers.
Visitors can try out traditional machines as well as new-generation slots with high-quality visuals and interactive gameplay.
Whether you’re a beginner or a seasoned gamer, there’s a game that fits your style.
casino
All slot machines are available anytime and compatible with desktop computers and tablets alike.
All games run in your browser, so you can jump into the action right away.
The interface is user-friendly, making it quick to explore new games.
Register now, and dive into the world of online slots!
I am delighted that I noticed this site, just the right information that I was looking for! .
I have been exploring for a bit for any high-quality articles or blog posts on this sort of space . Exploring in Yahoo I at last stumbled upon this site. Studying this information So i am happy to convey that I’ve an incredibly just right uncanny feeling I came upon just what I needed. I so much indisputably will make certain to do not overlook this site and provides it a glance regularly.
I was reading through some of your posts on this site and I think this site is very instructive! Keep on posting.
The next time I read a blog, I hope that it doesnt disappoint me as much as this one. I mean, I know it was my choice to read, but I actually thought youd have something interesting to say. All I hear is a bunch of whining about something that you could fix if you werent too busy looking for attention.
The site provides a wide range of medical products for ordering online.
Anyone can conveniently access needed prescriptions from your device.
Our inventory includes everyday medications and more specific prescriptions.
Each item is supplied through licensed pharmacies.
https://community.alteryx.com/t5/user/viewprofilepage/user-id/577832
We maintain quality and care, with secure payments and timely service.
Whether you’re managing a chronic condition, you’ll find what you need here.
Begin shopping today and get convenient support.
whoah this weblog is fantastic i like studying your articles. Keep up the good paintings! You already know, lots of people are looking around for this information, you can aid them greatly.
Thank you for the good writeup. It in fact was a amusement account it. Look advanced to far added agreeable from you! However, how could we communicate?
This blog is definitely rather handy since I’m at the moment creating an internet floral website – although I am only starting out therefore it’s really fairly small, nothing like this site. Can link to a few of the posts here as they are quite. Thanks much. Zoey Olsen
Данный ресурс — интернет-представительство лицензированного расследовательской службы.
Мы предлагаем сопровождение по частным расследованиям.
Коллектив опытных специалистов работает с предельной конфиденциальностью.
Наша работа включает проверку фактов и разные виды расследований.
Заказать детектива
Каждое дело рассматривается индивидуально.
Задействуем проверенные подходы и действуем в правовом поле.
Ищете реальную помощь — добро пожаловать.
Really fantastic info can be found on blog. “Compassion for myself is the most powerful healer of them all.” by Theodore Isaac Rubin.
What’s Happening i’m new to this, I stumbled upon this I’ve found It positively helpful and it has aided me out loads. I hope to contribute & aid other users like its aided me. Good job.
With havin so much written content do you ever run into any issues of plagorism or copyright violation? My blog has a lot of completely unique content I’ve either written myself or outsourced but it seems a lot of it is popping it up all over the internet without my permission. Do you know any ways to help stop content from being stolen? I’d definitely appreciate it.
Here, you can find lots of slot machines from famous studios.
Visitors can enjoy retro-style games as well as feature-packed games with stunning graphics and bonus rounds.
If you’re just starting out or a casino enthusiast, there’s something for everyone.
play aviator
All slot machines are available anytime and compatible with PCs and mobile devices alike.
No download is required, so you can get started without hassle.
Site navigation is intuitive, making it simple to explore new games.
Sign up today, and enjoy the thrill of casino games!
I’d need to examine with you here. Which is not one thing I often do! I take pleasure in studying a put up that can make folks think. Also, thanks for allowing me to remark!
You are my inspiration , I have few blogs and rarely run out from to brand.
Great write-up, I am regular visitor of one’s website, maintain up the excellent operate, and It’s going to be a regular visitor for a long time.
Excellent blog right here! Additionally your website quite a bit up very fast! What host are you using? Can I am getting your associate link on your host? I want my website loaded up as quickly as yours lol
Do you have a spam issue on this blog; I also am a blogger, and I was curious about your situation; we have created some nice practices and we are looking to trade strategies with other folks, why not shoot me an e-mail if interested.
На этом сайте предлагает поиска работы в Украине.
Здесь вы найдете свежие вакансии от разных организаций.
Система показывает предложения в разнообразных нишах.
Удалённая работа — решаете сами.
https://my-articles-online.com/
Поиск простой и рассчитан на любой уровень опыта.
Оставить отклик займёт минимум времени.
Хотите сменить сферу? — просматривайте вакансии.
Good day! Do you use Twitter? I’d like to follow you if that would be okay. I’m absolutely enjoying your blog and look forward to new updates.
As soon as I observed this site I went on reddit to share some of the love with them.
This is really interesting, You’re a very skilled blogger. I have joined your rss feed and look forward to seeking more of your fantastic post. Also, I’ve shared your website in my social networks!
Utterly written content, thankyou for entropy.
Saved as a favorite, I really like your blog!
Thank you for each of your labor on this web page. My niece enjoys working on internet research and it is obvious why. Almost all know all of the compelling mode you offer practical guidance via your website and as well as foster contribution from some other people on this subject so our daughter is in fact being taught a great deal. Enjoy the remaining portion of the year. Your conducting a splendid job.
Very interesting subject, thank you for posting.
I think that is one of the so much significant info for me. And i’m glad studying your article. However should commentary on few basic things, The website style is great, the articles is in point of fact nice : D. Excellent task, cheers
Once I initially commented I clicked the -Notify me when new feedback are added- checkbox and now every time a remark is added I get 4 emails with the identical comment. Is there any means you may remove me from that service? Thanks!
Yay google is my king assisted me to find this great internet site! .
On this platform, you can access a wide selection of online slots from leading developers.
Visitors can try out classic slots as well as feature-packed games with vivid animation and exciting features.
If you’re just starting out or a seasoned gamer, there’s a game that fits your style.
play aviator
The games are ready to play round the clock and compatible with laptops and mobile devices alike.
You don’t need to install anything, so you can start playing instantly.
Site navigation is user-friendly, making it simple to explore new games.
Register now, and dive into the world of online slots!
Hello.This article was really motivating, especially since I was investigating for thoughts on this topic last couple of days.
Some times its a pain in the ass to read what people wrote but this site is rattling user pleasant! .
Great post, you have pointed out some fantastic points, I too conceive this s a very excellent website.
On this platform, you can access a great variety of casino slots from famous studios.
Players can enjoy classic slots as well as feature-packed games with high-quality visuals and interactive gameplay.
Whether you’re a beginner or an experienced player, there’s always a slot to match your mood.
play casino
The games are ready to play anytime and compatible with laptops and mobile devices alike.
No download is required, so you can start playing instantly.
The interface is easy to use, making it quick to explore new games.
Sign up today, and enjoy the thrill of casino games!
Here, you can access lots of slot machines from top providers.
Players can enjoy traditional machines as well as new-generation slots with high-quality visuals and bonus rounds.
Even if you’re new or a seasoned gamer, there’s a game that fits your style.
casino games
The games are available anytime and compatible with PCs and smartphones alike.
All games run in your browser, so you can start playing instantly.
Platform layout is user-friendly, making it convenient to browse the collection.
Sign up today, and discover the excitement of spinning reels!
I am not sure where you are getting your info, but great topic. I needs to spend some time learning more or understanding more. Thanks for great information I was looking for this info for my mission.
I think other website proprietors should take this web site as an model, very clean and great user friendly style and design, let alone the content. You’re an expert in this topic!
We are a group of volunteers and starting a new scheme in our community. Your website offered us with valuable information to work on. You have done a formidable job and our entire community will be thankful to you.
Very interesting information!Perfect just what I was looking for!
Thank you for helping out, wonderful information. “A man will fight harder for his interests than for his rights.” by Napoleon Bonaparte.
Nice blog! Is your theme custom made or did you download it from somewhere? A theme like yours with a few simple adjustements would really make my blog shine. Please let me know where you got your design. With thanks
Can I just say what a reduction to find someone who really knows what theyre talking about on the internet. You definitely know the best way to deliver a difficulty to mild and make it important. More people have to learn this and perceive this facet of the story. I cant imagine youre not more common because you undoubtedly have the gift.
Valuable information. Lucky me I found your website by accident, and I’m shocked why this accident did not happened earlier! I bookmarked it.
Hey, you used to write magnificent, but the last few posts have been kinda boringK I miss your tremendous writings. Past few posts are just a little bit out of track! come on!
Currently it looks like BlogEngine is the top blogging platform out there right now. (from what I’ve read) Is that what you are using on your blog?
I was recommended this website through my cousin. I’m now not sure whether or not this publish is written by him as nobody else understand such specified approximately my difficulty. You are wonderful! Thanks!
I think this web site has got some real superb info for everyone :D. “We rarely think people have good sense unless they agree with us.” by Francois de La Rochefoucauld.
Very nice post and right to the point. I don’t know if this is actually the best place to ask but do you people have any ideea where to hire some professional writers? Thanks 🙂
Here, you can find a wide selection of casino slots from famous studios.
Players can enjoy classic slots as well as modern video slots with stunning graphics and exciting features.
Whether you’re a beginner or an experienced player, there’s always a slot to match your mood.
money casino
Each title are ready to play 24/7 and designed for PCs and smartphones alike.
No download is required, so you can get started without hassle.
Site navigation is user-friendly, making it quick to find your favorite slot.
Sign up today, and discover the excitement of spinning reels!
Were you aware that 1 in 3 medication users commit preventable pharmaceutical mishaps because of insufficient information?
Your wellbeing should be your top priority. Each pharmaceutical choice you implement significantly affects your body’s functionality. Staying educated about your prescriptions is absolutely essential for disease prevention.
Your health depends on more than swallowing medications. All pharmaceutical products interacts with your physiology in specific ways.
Remember these life-saving facts:
1. Combining medications can cause health emergencies
2. Over-the-counter supplements have potent side effects
3. Self-adjusting treatment undermines therapy
For your safety, always:
✓ Research combinations using official tools
✓ Review guidelines thoroughly when starting new prescriptions
✓ Ask your pharmacist about proper usage
___________________________________
For verified medication guidance, visit:
https://coactuem.ub.edu/profiles/christinatrent/
I am only writing to make you know of the extraordinary discovery our girl had browsing your site. She noticed some things, with the inclusion of what it’s like to have a great helping mood to have the others effortlessly completely grasp chosen extremely tough matters. You truly did more than her desires. Thanks for giving these practical, trustworthy, edifying and also fun tips about this topic to Janet.
It’s actually a great and helpful piece of information. I’m glad that you shared this helpful information with us. Please keep us informed like this. Thanks for sharing.
I think other website owners should take this website as an model, very clean and fantastic user genial layout.
Hello! This is my first comment here so I just wanted to give a quick shout out and tell you I truly enjoy reading your blog posts. Can you suggest any other blogs/websites/forums that deal with the same topics? Appreciate it!
I was suggested this web site by my cousin. I am not certain whether or not this put up is written by means of him as nobody else recognise such unique about my difficulty. You’re wonderful! Thanks!
Thank you for your entire labor on this web site. My aunt takes pleasure in doing internet research and it is easy to see why. My partner and i know all relating to the dynamic mode you deliver important suggestions via the web blog and therefore attract response from the others on this subject matter and our favorite princess is in fact discovering a lot of things. Enjoy the remaining portion of the new year. You are always doing a brilliant job.
Hi, Neat post. There is a problem with your website in internet explorer, would test this… IE still is the market leader and a big portion of people will miss your magnificent writing because of this problem.
The digital drugstore offers an extensive variety of pharmaceuticals for budget-friendly costs.
Shoppers will encounter various medicines for all health requirements.
We work hard to offer safe and effective medications without breaking the bank.
Fast and reliable shipping ensures that your purchase is delivered promptly.
Take advantage of shopping online through our service.
generic vs brand name drugs
Magnificent beat ! I wish to apprentice while you amend your web site, how could i subscribe for a blog website? The account helped me a acceptable deal. I had been tiny bit acquainted of this your broadcast provided bright clear idea
I will immediately grasp your rss feed as I can not in finding your e-mail subscription hyperlink or e-newsletter service. Do you’ve any? Kindly permit me recognize so that I could subscribe. Thanks.
whoah this blog is magnificent i love reading your posts. Keep up the great work! You know, lots of people are searching around for this information, you could help them greatly.
I really appreciate this post. I have been looking all over for this! Thank goodness I found it on Bing. You have made my day! Thx again
I love it when people come together and share opinions, great blog, keep it up.
I regard something really special in this website .
Pin up Casino: The Best Online Casino in Canada
Pin-up – http://pinupcasinopinup.ca is your best choice for online gaming in Canada. With lucrative bonuses, Pinup ensures endless entertainment for every player.
What Makes Best Online Casino Canada Stand Out?
Diverse Game Collection
At Pinup Casino Canada, you’ll find:
Slot Games: Choose from modern video slots with immersive themes.
Live Dealer Games: Play roulette with professional dealers in real time.
Table Games: Enjoy poker, craps, and other timeless classics.
Betting Options for Canadians: Bet on hockey, football, basketball, and more!
Exciting Rewards
Pin-up offers valuable rewards, including:
New Player Offer: Enjoy an impressive welcome package.
VIP Program: Earn exclusive perks and rewards as a regular player.
Weekly Promotions: Take advantage of free spins, cashback deals, and more every week!
Tailored for Canadian Players
Pin-up is designed with Canadians in mind, offering:
CAD-Friendly Transactions: Use Visa for deposits and withdrawals.
Multilingual Support: English and French assistance available.
Reliable Transactions: Enjoy peace of mind with secure processing.
Seamless Mobile Experience
Whether you’re at home or traveling, Pinup offers a fully optimized mobile platform.
Fair and Transparent
Pinup is licensed and adheres to fair play regulations. With advanced encryption, your data and transactions are always safe.
How to Get Started at Pinup Casino Canada?
Sign Up: Visit the official Pin-up website and register.
Claim Your Bonus: Make your first deposit and enjoy exclusive bonuses.
Start Playing: Explore a variety of games and aim for big wins!
Why Choose Pin-up?
With exciting promotions, Pinup delivers a complete gaming experience. Whether you love sports betting, there’s something for everyone.
Visit Casino Canada today and start your gaming journey!
I believe other website owners should take this site as an example , very clean and wonderful user friendly style and design.
This web site is really a walk-through for all of the info you wanted about this and didn’t know who to ask. Glimpse here, and you’ll definitely discover it.
The Salt Trick is a natural technique that involves using specific salts, such as Blue Salt, to enhance male performance
I¦ve recently started a web site, the information you provide on this website has helped me tremendously. Thank you for all of your time & work.
The Natural Mounjaro Recipe is more than just a diet—it’s a sustainable and natural approach to weight management and overall health.
After all, what a great site and informative posts, I will upload inbound link – bookmark this web site? Regards, Reader.
Mitolyn is a cutting-edge natural dietary supplement designed to support effective weight loss and improve overall wellness.
I went over this web site and I conceive you have a lot of fantastic information, saved to fav (:.
Hello very cool website!! Guy .. Excellent .. Superb .. I will bookmark your website and take the feeds additionally?KI’m satisfied to search out numerous helpful information right here in the submit, we need develop extra techniques in this regard, thank you for sharing. . . . . .
ProDentim is a chewable oral probiotic supplement formulated with a unique mix of probiotics, prebiotics, herbs, and nutrients.
This section presents CD player radio alarm clocks made by leading brands.
Browse through modern disc players with digital radio and dual alarms.
These devices offer auxiliary inputs, device charging, and power outage protection.
Available products spans economical models to high-end designs.
cd player and alarm clock
Each one offer sleep timers, auto-off timers, and LED screens.
Shop the collection are available via online retailers with free delivery.
Discover the perfect clock-radio-CD setup for bedroom or office use.
I have been examinating out many of your posts and i must say nice stuff. I will definitely bookmark your website.
On this platform, you can find a wide selection of slot machines from top providers.
Visitors can enjoy retro-style games as well as feature-packed games with stunning graphics and interactive gameplay.
If you’re just starting out or a seasoned gamer, there’s something for everyone.
money casino
Each title are instantly accessible 24/7 and compatible with PCs and tablets alike.
All games run in your browser, so you can start playing instantly.
The interface is user-friendly, making it simple to explore new games.
Sign up today, and enjoy the thrill of casino games!
Our platform offers off-road vehicle rentals on the island of Crete.
Anyone can easily reserve a vehicle for travel.
If you’re looking to see natural spots, a buggy is the perfect way to do it.
https://www.zillow.com/profile/buggycrete
Our rides are ready to go and available for daily rentals.
Through our service is hassle-free and comes with great support.
Begin the adventure and discover Crete from a new angle.
Great wordpress blog here.. It’s hard to find quality writing like yours these days. I really appreciate people like you! take care
Very interesting topic, thankyou for putting up. “Ok. Sex is fine. Sex is good. Sex is GREAT Okay, okay, we need men for sex… Do we need so many” by Sybil Adelman.
But a smiling visitant here to share the love (:, btw great pattern. “Make the most of your regrets… . To regret deeply is to live afresh.” by Henry David Thoreau.
The next time I learn a weblog, I hope that it doesnt disappoint me as much as this one. I imply, I do know it was my choice to read, however I really thought youd have one thing interesting to say. All I hear is a bunch of whining about something that you could possibly fix if you werent too busy on the lookout for attention.
I don’t think the title of your article matches the content lol. Just kidding, mainly because I had some doubts after reading the article.
Oh my goodness! an amazing article dude. Thank you Nonetheless I am experiencing situation with ur rss . Don’t know why Unable to subscribe to it. Is there anybody getting equivalent rss downside? Anyone who knows kindly respond. Thnkx
I was more than happy to search out this internet-site.I needed to thanks on your time for this glorious learn!! I undoubtedly enjoying each little little bit of it and I have you bookmarked to check out new stuff you blog post.
Оформление страховки во время путешествия — это обязательное условие для спокойствия гражданина.
Полис гарантирует медицинские услуги в случае заболевания за границей.
К тому же, полис может обеспечивать оплату на медицинскую эвакуацию.
полис каско
Многие страны требуют предоставление документа для пересечения границы.
Без наличия документа госпитализация могут обойтись дорого.
Получение сертификата перед выездом
Hi are using WordPress for your blog platform? I’m new to the blog world but I’m trying to get started and set up my own. Do you need any html coding knowledge to make your own blog? Any help would be really appreciated!
I don’t even know how I ended up here, but I thought this post was great. I don’t know who you are but definitely you are going to a famous blogger if you are not already 😉 Cheers!
Merely wanna input that you have a very decent site, I enjoy the style it actually stands out.
Great blog right here! Additionally your site a lot up fast! What host are you using? Can I am getting your affiliate hyperlink on your host? I want my website loaded up as fast as yours lol
Howdy! I simply want to give a huge thumbs up for the great info you could have here on this post. I will be coming back to your blog for extra soon.
Good day! This is my 1st comment here so I just wanted to give a quick shout out and say I truly enjoy reading through your posts. Can you recommend any other blogs/websites/forums that cover the same topics? Many thanks!
The Salt Trick is a natural technique that involves using specific salts, such as Blue Salt, to enhance male performance
Unquestionably believe that which you stated. Your favorite justification appeared to be on the internet the simplest thing to be aware of. I say to you, I certainly get irked while people think about worries that they just don’t know about. You managed to hit the nail upon the top as well as defined out the whole thing without having side effect , people can take a signal. Will likely be back to get more. Thanks
Mitolyn is a cutting-edge natural dietary supplement designed to support effective weight loss and improve overall wellness.
I have recently started a blog, the info you offer on this web site has helped me tremendously. Thanks for all of your time & work.
Enjoyed looking at this, very good stuff, regards.
Whoa! This blog looks exactly like my old one! It’s on a completely different topic but it has pretty much the same layout and design. Superb choice of colors!
When I originally commented I clicked the -Notify me when new comments are added- checkbox and now each time a comment is added I get four emails with the same comment. Is there any way you can remove me from that service? Thanks!
I’m impressed, I must say. Actually rarely do I encounter a weblog that’s both educative and entertaining, and let me inform you, you could have hit the nail on the head. Your idea is excellent; the issue is something that not sufficient people are speaking intelligently about. I am very happy that I stumbled throughout this in my search for something regarding this.
It?¦s truly a great and helpful piece of info. I?¦m glad that you just shared this helpful information with us. Please stay us up to date like this. Thanks for sharing.
I am now not positive the place you are getting your information, but good topic. I must spend some time finding out more or understanding more. Thank you for wonderful info I used to be searching for this information for my mission.
Great post, you have pointed out some great details , I likewise think this s a very fantastic website.
you have a great blog here! would you like to make some invite posts on my blog?
Enjoyed examining this, very good stuff, thanks.
When I initially commented I clicked the “Notify me when new comments are added” checkbox and now each time a comment is added I get four e-mails with the same comment. Is there any way you can remove people from that service? Thanks a lot!
Some really interesting information, well written and loosely user friendly.
Very interesting info!Perfect just what I was looking for!
This website offers many types of prescription drugs for online purchase.
Users can easily access health products from anywhere.
Our inventory includes everyday treatments and custom orders.
The full range is supplied through licensed suppliers.
buy suhagra 100mg
We maintain user protection, with data protection and timely service.
Whether you’re treating a cold, you’ll find affordable choices here.
Explore our selection today and get convenient healthcare delivery.
Your style is so unique compared to many other people. Thank you for publishing when you have the opportunity,Guess I will just make this bookmarked.2
Oh my goodness! a tremendous article dude. Thank you However I am experiencing subject with ur rss . Don’t know why Unable to subscribe to it. Is there anyone getting an identical rss problem? Anybody who knows kindly respond. Thnkx
You can definitely see your expertise in the work you write. The world hopes for more passionate writers like you who are not afraid to say how they believe. Always follow your heart.
Merely wanna comment that you have a very nice website , I like the style and design it really stands out.
PrimeBiome is a dietary supplement designed to support gut health by promoting a balanced microbiome, enhancing digestion, and boosting overall well-being.
В данном ресурсе доступны актуальные промокоды Melbet-промо.
Воспользуйтесь ими зарегистрировавшись на сайте и получите до 100% за первое пополнение.
Плюс ко всему, доступны бонусы в рамках действующих программ игроков со стажем.
мелбет промокод при регистрации на фрибут
Проверяйте регулярно в разделе промокодов, чтобы не упустить выгодные предложения для Мелбет.
Все промокоды тестируется на работоспособность, и обеспечивает безопасность во время активации.
Модные тенденции 2025 года в наши дни становиться заметными.
В центре внимания — природность, что выражается мягких материалах лаконичных формах.
Большой интерес завоевывают модели с глубокими вырезами, которые добавляют изящество.
http://www.comrades-horde.ru/forums/viewtopic.php?f=18&t=458200
Цветовая палитра обогащается, добавляя мягкие оттенки, такие как: лаванда.
Детализация остается важным, прежде всего кружева ручное оформление.
Неожиданным трендом представляются гибридные модели, к примеру: платье-комбинация.
Thanks for any other informative web site. The place else could I get that kind of info written in such an ideal approach? I’ve a mission that I am simply now operating on, and I’ve been at the look out for such information.
I have been absent for a while, but now I remember why I used to love this site. Thanks , I’ll try and check back more frequently. How frequently you update your website?
Great post. I am facing a couple of these problems.
You made some decent points there. I did a search on the issue and found most persons will consent with your blog.
I have been checking out many of your posts and i can claim nice stuff. I will make sure to bookmark your blog.
obviously like your web site but you have to check the spelling on quite a few of your posts. Several of them are rife with spelling problems and I find it very bothersome to tell the truth nevertheless I will certainly come back again.
Here, you can discover lots of casino slots from leading developers.
Players can experience traditional machines as well as new-generation slots with vivid animation and exciting features.
Even if you’re new or a casino enthusiast, there’s something for everyone.
slots
All slot machines are available anytime and optimized for PCs and tablets alike.
You don’t need to install anything, so you can get started without hassle.
The interface is intuitive, making it quick to browse the collection.
Join the fun, and enjoy the thrill of casino games!
Its excellent as your other blog posts : D, thankyou for putting up.
Slot dunyas?na hos geldiniz!
Bugun gates of olympus demo oyna ile sans?n?z? denemeye ne dersiniz?
Pragmatic Play’in en populer oyunu burada sizleri bekliyor!
?? gates of olympus slot — devasa kazanclar ile dolu!
?? gates of olympus giris baglant?s?yla hemen oynamaya baslay?n, bedava spinler sizinle olsun!
? En iyi zamanlar: gates of olympus hangi saatlerde oynan?r icin ipuclar? da sitemizde!
?? Hilesiz, guvenli ve eglenceli bir deneyim ar?yorsan?z gates of olympus hilesi hakk?nda detaylara goz atmay? unutmay?n.
??
gates of olympus demo turkce
I think other web-site proprietors should take this site as an model, very clean and fantastic user friendly style and design, let alone the content. You are an expert in this topic!
What’s Happening i am new to this, I stumbled upon this I’ve found It positively useful and it has aided me out loads. I hope to contribute & assist other users like its helped me. Good job.
Hey! Would you mind if I share your blog with my myspace group? There’s a lot of folks that I think would really enjoy your content. Please let me know. Many thanks
Hello my friend! I wish to say that this article is amazing, nice written and include approximately all important infos. I would like to see more posts like this.
Wonderful work! This is the type of info that should be shared around the net. Shame on Google for not positioning this post higher! Come on over and visit my site . Thanks =)
Keep working ,splendid job!
Hi, Neat post. There is a problem with your web site in internet explorer, would test this… IE still is the market leader and a huge portion of people will miss your great writing due to this problem.
superb post.Never knew this, thankyou for letting me know.
… [Trackback]
[…] There you will find 81143 more Infos: beyondsims.com/2021/02/ts1-install-guide/ […]
Thanx for the effort, keep up the good work Great work, I am going to start a small Blog Engine course work using your site I hope you enjoy blogging with the popular BlogEngine.net.Thethoughts you express are really awesome. Hope you will right some more posts.
Crop Whip https://xxxxxxxxxxxxxxx.co/
Blindfolded https://xxxxxxxxxxxxxxx.co/
Dyed Hair https://xxxxxxxxxxxxxxx.co/
Saggy Tits https://xxxxxxxxxxxxxxx.co/
Chinese https://xxxxxxxxxxxxxxx.co/
Tied Up https://xxxxxxxxxxxxxxx.co/
Hairless https://xxxxxxxxxxxxxxx.co/
Rubbing https://xxxxxxxxxxxxxxx.co/
Wow! Thank you! I continuously wanted to write on my website something like that. Can I include a portion of your post to my blog?
Booty Shake https://xxxxxxxxxxxxxxx.co/
Bar https://xxxxxxxxxxxxxxx.co/
Cougar https://xxxxxxxxxxxxxxx.co/
Comic https://xxxxxxxxxxxxxxx.co/
Ebony Teen https://xxxxxxxxxxxxxxx.co/
Muff Diving https://xxxxxxxxxxxxxxx.co/
Model https://xxxxxxxxxxxxxxx.co/
This is a great blog post, thanks for sharing. Really excited to read more desire more! 카지노사이트
I really enjoyed your blog post. Really excited to read more. Amazingly cool!안전놀이터
I want to express my gratitude for the blog post. Really excited to read more. Great.
신용카드현금화
Fantastic great post This is a great post, thanks for sharing it. Gratitude again. Awesome.파워볼사이트
This website was, how shall I put it? Relevant!! I’ve at last discovered something useful. Cheers! 파워볼사이트
I genuinely enjoy reading on this website , it has got great blog posts.
파워볼사이트
I’ve been exploring for a bit for any high quality articles or blog posts in this kind of area.토토사이트
I appreciate your article. Really excited to read more. Many thanks.
온라인카지노
Only wanna input that you have a very decent site, I love the pattern it actually stands out.
Navigate Washington DC and Maryland affordably with KV Limo’s transportation services. From charter buses to motor coaches, explore reliable options that prioritize comfort and accessibility. KV Limo ensures your travel needs are met seamlessly and affordably.
Dubai Airport Transfer offers fast and efficient transportation with real-time updates. Known for being the Best Dubai Airport Transfer, our services cater to all types of travelers. Whether it’s business or leisure, Airport Transfer Dubai ensures your trip starts and ends without delays or stress.
Bachelor party bus Miami gives your group VIP treatment. Perfect for groomsmen, our luxury party bus Miami includes entertainment and comfort. We offer Miami party bus Limo, Miami wedding limo, prom limo Miami, sprinter van rental Miami, and corporate transportation Miami backed by top-rated limousine service Miami and charter bus options.
Crank up the excitement with a Miami Bachelor Party Bus Rental. Hop into our lively Bachelor Party Bus Miami or classic Miami Bachelor Party Limo and get ready to tour clubs in style. Experience flawless Miami nightlife transportation while enjoying unmatched Luxury Limo Service Miami and an epic VIP Bachelor Party Limo atmosphere.
Miami Party Bus Rentals deliver luxury, affordability, and unmatched service. From Kids Birthday Party Buses to Miami Stag Party Bus Rentals, we cater to every occasion. Celebrate in style with Party Bus Miami\u2019s exceptional fleet and personalized services!
Travel in style with our Black Car SUV service, offering luxury SUV transportation across Southern California. From Rancho Cucamonga to Disneyland and Riverside to Orange County Airport, our executive chauffeur service ensures every ride is a first-class experience.
After research a number of of the blog posts on your web site now, and I truly like your manner of blogging. I bookmarked it to my bookmark web site checklist and can be checking back soon. Pls check out my website as nicely and let me know what you think.
You are my intake, I have few web logs and often run out from to brand.
Just about all of whatever you mention happens to be supprisingly accurate and that makes me wonder the reason why I hadn’t looked at this with this light before. This particular article really did turn the light on for me personally as far as this particular subject goes. However at this time there is 1 point I am not too comfy with and while I make an effort to reconcile that with the actual core theme of the position, allow me see just what the rest of your visitors have to say.Well done.
Здесь доступен сервис “Глаз Бога”, который собрать данные по человеку по публичным данным.
Инструмент функционирует по номеру телефона, обрабатывая доступные данные в Рунете. Через бота можно получить бесплатный поиск и полный отчет по имени.
Инструмент обновлен согласно последним данным и включает фото и видео. Сервис сможет узнать данные в открытых базах и отобразит результаты в режиме реального времени.
пробить через глаз бога
Это бот — выбор для проверки людей онлайн.
I’ll right away seize your rss feed as I can’t find your e-mail subscription link or e-newsletter service. Do you have any? Kindly permit me recognise in order that I may just subscribe. Thanks.
I simply could not depart your website prior to suggesting that I actually loved the usual information an individual supply on your guests? Is gonna be back steadily in order to check out new posts
Luxury mechanical watches combine centuries-old craftsmanship with cutting-edge engineering, offering sophisticated design through automatic mechanisms that harness kinetic energy.
From openworked displays to hand-polished tourbillons, these timepieces showcase technical artistry in materials like 18k rose gold and anti-reflective glass.
Brands like Rolex and Patek Philippe craft legendary models with extended autonomy and dive-ready durability, merging functionality with exclusivity.
ap 15450
Unlike quartz alternatives, mechanical watches require no batteries, relying on mainspring energy or rotor systems to deliver reliable timekeeping.
Explore vintage-inspired designs at retailers like CHRONEXT, where new luxury watches from top maisons are available with certified authenticity.
Very interesting article! Thanks for sharing this information and keeping us updated.
Just a smiling visitor here to share the love (:, btw great design.
I just could not depart your web site prior to suggesting that I extremely enjoyed the standard info a person provide for your visitors? Is going to be back often to check up on new posts
I’ve read several excellent stuff here. Certainly price bookmarking for revisiting. I surprise how so much attempt you put to make one of these excellent informative web site.
I am constantly searching online for ideas that can assist me. Thx!
?Looking for the best south africa casino?
Discover south africa online casino — your go-to destination for slots casino real money south africa.
Here’s what you’ll find:
– ?? all casino games in south africa
– ?? no deposit bonus casino south africa real money
– ?? free signup bonus no deposit casino south africa real money
– ?? casino login south africa
– ?? best paying online casino south africa
– ?? new no deposit bonus casino south africa
– ?? birthday bonus casino south africa
– ???? african grand casino no deposit bonus r300 south africa
– ?? casino no deposit bonus south africa
– ?? casino slots south africa
Create your free account and explore the best casino experience.
Don’t miss your chance to win real money!
?Play like a pro!
I like this website very much so much excellent information.
exchange USDT ERC20 in UK
I was just looking for this info for a while. After six hours of continuous Googleing, at last I got it in your website. I wonder what’s the lack of Google strategy that do not rank this kind of informative web sites in top of the list. Normally the top websites are full of garbage.
Hey! Someone in my Myspace group shared this site with us so I came
to look it over.I’m definitely enjoying the information. I’m book-marking and will be tweeting this to my followers!
Excellent blog and fantastic design.
Very good written information. It will be helpful to everyone who usess it, as well as me. Keep up the good work – i will definitely read more posts.
It’s going to be ennd of mine day, except
before ending I am reading this wonderful post to improve my knowledge.
Reliable team excellence, dependable as clockwork service. Professional integrity appreciated. Reliability appreciated.
Este site é realmente fabuloso. Sempre que acesso eu encontro coisas diferentes Você também vai querer acessar o nosso site e descobrir mais detalhes! conteúdo único. Venha descobrir mais agora! 🙂
Outstanding attention to detail, perfect for our move-in cleaning. Booking you for spring cleaning. Really impressed.
Good – I should certainly pronounce, impressed with your website. I had no trouble navigating through all the tabs and related info ended up being truly simple to do to access. I recently found what I hoped for before you know it in the least. Quite unusual. Is likely to appreciate it for those who add forums or something, web site theme . a tones way for your customer to communicate. Nice task..
I was very pleased to find this web-site.I wanted to thanks for your time for this wonderful read!! I definitely enjoying every little bit of it and I have you bookmarked to check out new stuff you blog post.
Virtual casino sites are growing rapidly.
They offer jackpots, poker and roulette.
Players enjoy fast deposits
and crypto-friendly banking.
Casino rewards include reload deals and loyalty points.
These increase fun.
Most platforms arre mobile-optimized,
so users can access full features on mobile.
Overall, digital casinos provide a mix of security and excitement,
making them the future of digital gaming.
gdzie mozna kupic prawo jazdy z wpisem do rejestru, kupić prawo jazdy, legalne prawo jazdy do kupienia, kupię prawo jazdy, jak załatwić prawo jazdy, bez egzaminu, jak kupić prawo jazdy, czy można kupić prawo jazdy, legalne prawo jazdy do kupienia 2025, pomogę zdać egzamin na prawo jazdy, prawo jazdy bez egzaminu, gdzie kupić prawo jazdy bez egzaminu, gdzie kupić prawo jazdy na lewo, jak kupić prawo jazdy w niemczech, gdzie kupic prawo jazdy legalnie, kupić prawo jazdy b, pomogę zdać egzamin na prawo jazdy, gdzie można kupić prawo jazdy z wpisem do rejestru forum, prawo jazdy płatne przy odbiorze, prawo jazdy czechy kupno, w jakim kraju można kupić prawo jazdy, pomogę załatwić prawo jazdy w uk, sprzedam prawo jazdy z wpisem bez zaliczek, jak kupić prawo jazdy w uk, ile kosztuje prawo jazdy na lewo?, iuhki9
sportbootführerschein binnen und see, sportbootführerschein binnen prüfungsfragen, sportbootführerschein binnen kosten, sportbootführerschein binnen online, sporthochseeschifferschein kaufen, sportbootführerschein binnen berlin, sportbootführerschein binnen segel, sportbootführerschein kaufen, sportseeschifferschein kaufen erfahrungen, sportküstenschifferschein kaufen schwarz, sportbootführerschein see kaufen, sportbootführerschein binnen kaufen, sportbootführerschein see kaufen ohne prüfung, bootsführerschein kaufen, bootsführerschein kaufen polen, bootsführerschein kaufen erfahrungen, bootsführerschein online kaufen, bootsführerschein tschechien kaufen, SSS kaufen, SKS kaufen, SHS kaufen, führerschein kaufen,sportbootführerschein see, österreichischen führerschein kaufen legal, kaufen swiss registrierte führerschein, registrierten führerschein kaufen berlin, echten führerschein kaufen Köln, legal führerschein kaufen, echten deutschen führerschein kaufen, deutschen registrierten führerschein kaufen, osterreichischen-fuhrerschein-kaufen zürich, deutschen registrierten führerschein kaufen…6tf4
I wanted to thank you for this fantastic read!! I absolutely
enjoyed every bit of it. I have you saved as
a favorite to check out new things you post…
I wanted to thank you for this fantastic read! I truly enjoyed every bit of it and have bookmarked your page to check out the new content you post. At Foodsure Machines, we take pride in being a trusted manufacturer of various food processing machines, including Makhana machines, Mayonnaise machines, Tomato Ketchup machines, and Energy Bar machines. Looking forward to reading more valuable insights from you!
Great stuff, Thanks.
This guide is a lifesaver! The order of installation can be a pain, but it made everything smooth for me. Worth the read.
You’ve got to keep the original CDs handy, or else it’s a headache. The game might need them to run properly.
I stumbled upon https://cobocbd.com/collections/cbd-for-seniors and honestly, it’s such a refreshing find! The products are tailored perfectly for seniors — soothing aches, improving sleep, and bringing a sense of calm naturally. I love how Cobo CBD keeps it simple yet effective, with clear descriptions and trustworthy ingredients. It’s great to see a brand that genuinely cares about senior wellness instead of just following trends. If you’re looking for a natural way to feel relaxed and balanced every day, this collection is worth exploring.
Get your Cricket ID Online within a few minutes from India’s #1 cricket betting site offers a secure, trusted, and user-friendly platform for cricket enthusiasts. Enjoy competitive odds, fast transactions, and a wide range of matches to bet on. Join thousands of satisfied players who trust us for a safe, exciting, and rewarding online cricket betting experience.
Se você se deparar com esta mensagem buscando comprar uma carteira de motorista registrada sem os exames então estamos aqui para ajudá-lo, basta clicar no link abaixo para falar com um agente. o agente irá orientá-lo sobre como obter a carteira de motorista
https://imt-cartadeconducao.com/
Als u dit bericht tegenkomt waarin u probeert een geregistreerd rijbewijs te kopen zonder de examens, dan staan wij voor u klaar. Klik eenvoudig op de onderstaande link om met een agent te praten. de agent zal u begeleiden bij het verkrijgen van het rijbewijs b
https://mijnrijbewijscbr.com/
Als u dit bericht tegenkomt waarin u probeert een geregistreerd rijbewijs te kopen zonder de examens, dan staan wij voor u klaar. Klik eenvoudig op de onderstaande link om met een agent te praten. de agent zal u begeleiden bij het verkrijgen van het rijbewijs
https://echtrijbewijskopen.com/
Kup prawdziwe, zarejestrowane prawo jazdy na naszej stronie internetowej bez zdawania testów lub egzaminu praktycznego. Potrzebujemy tylko Twoich danych, które zostaną wprowadzone do systemu w ciągu najbliższych ośmiu dni. Prawo jazdy musi przejść taką samą procedurę rejestracji, jak te wydawane w szkołach jazdy,
https://polskieprawojazdy.com/
Als u dit bericht tegenkomt waarin u probeert een geregistreerd rijbewijs te kopen zonder de examens, dan staan wij voor u klaar. Klik eenvoudig op de onderstaande link om met een agent te praten. de agent zal u begeleiden bij het verkrijgen van het rijbewijs
https://kopakorkort-se.com/
Se ti imbatti in questo messaggio che cerca di acquistare una patente di guida registrata senza gli esami, allora siamo qui per te, fai semplicemente clic sul collegamento in basso per parlare con un agente. l’agente ti guiderà su come ottenere la patente di guida
https://compropatente.com/
Se você se deparar com esta mensagem buscando comprar uma carteira de motorista registrada sem os exames então estamos aqui para ajudá-lo, basta clicar no link abaixo para falar com um agente. o agente irá orientá-lo sobre como obter a carteira de motorista
https://cartadeconducaoimt.com/
zarejestrowane prawo jazdy na naszej stronie internetowej bez zdawania testów lub egzaminu praktycznego. Potrzebujemy tylko Twoich danych, które zostaną wprowadzone do systemu w ciągu najbliższych ośmiu dni. Prawo jazdy musi przejść taką samą procedurę rejestracji, jak te wydawane w szkołach jazdy,
https://mojeprawojazdycek.com/
Kup prawdziwe, zarejestrowane prawo jazdy na naszej stronie internetowej bez zdawania testów lub egzaminu praktycznego. Potrzebujemy tylko Twoich danych, które zostaną wprowadzone do systemu w ciągu najbliższych ośmiu dni. Prawo jazdy musi przejść taką samą procedurę rejestracji, jak te wydawane w szkołach jazdy,
https://europrawojazdy.com/
Achetez un permis de conduire réel et enregistré sur notre site Web sans passer d’examens ni passer le test pratique. tout ce dont nous avons besoin, ce sont vos données et elles seront enregistrées dans le système dans les huit prochains jours. Le permis de conduire doit subir la même procédure d’enregistrement que ceux délivrés dans les auto-écoles,
https://acheterpermis-conduire.com/
Great post! Adding to the discussion, a reliable OTP Verification system has become essential for any platform that wants fast and secure user authentication. Today’s verification solutions make it simple to send one-time passwords through SMS, email, or WhatsApp with strong delivery rates. The key is choosing an API that’s easy to integrate, supports quick validation, and includes fallback routes so users always receive their OTP on time. Detailed reporting and intelligent routing also help businesses reduce fraud and improve overall security. If anyone is building login flows, sign-up processes, or transaction approvals, a robust OTP Verification setup can significantly streamline the entire verification workflow and enhance user trust.
comprar cialis generico, donde comprar cialis, comprar cialis genérico, comprar cialis original, comprar xenical, comprar viagra, comprar viagra contrareembolso 48 horas, comprar viagra en españa, comprar viagra genérico online, comprar viagra madrid, comprar viagra en andorra, comprar viagra online 24h, comprar viagra por internet es legal, dónde comprar viagra en gibraltar, comprar, comprar tramadol, donde comprar codeina, comprar zolpidem online, comprar priligy, comprar kamagra, comprar kamagra contrareembolso, comprar kamagra milanuncios
Osta ajokortti, ota ajokortti, ajokortin uusiminen hinta, ajokortin uusiminen netissä, ajokortin uusiminen, ajokortin uusiminen lääkärintodistus, ajokortin uusiminen 80 vuotiaana, ajokortin lääkärintodistus, ajokortin hinta, ajokortin voimassaolo, ajokortin poikkeuslupa, ajokortin hakeminen, ajokortin tilaaminen, ajokortin korotus, ajokortin teoriakoe, ajokortin numero, B-ajokortti hinta , ajokortin hinta opetusluvalla, ajokortti myöntäjä, ajokortin myöntäminen
gdzie można kupic prawo jazdy z wpisem do rejestru, kupić prawo jazdy, legalne prawo jazdy do kupienia, kupię prawo jazdy, jak załatwić prawo jazdy, bez egzaminu, jak kupić prawo jazdy, czy można kupić prawo jazdy, legalne prawo jazdy do kupienia 2025, pomogę zdać egzamin na prawo jazdy, prawo jazdy bez egzaminu, gdzie kupić prawo jazdy bez egzaminu, gdzie kupić prawo jazdy na lewo, jak kupić prawo jazdy w niemczech, gdzie kupic prawo jazdy legalnie, kupić prawo jazdy b, pomogę zdać egzamin na prawo jazdy, gdzie można kupić prawo jazdy z wpisem do rejestru forum, prawo jazdy płatne przy odbiorze, prawo jazdy czechy kupno, w jakim kraju można kupić prawo jazdy, pomogę załatwić prawo jazdy w uk, sprzedam prawo jazdy z wpisem bez zaliczek, jak kupić prawo jazdy w uk, ile kosztuje prawo jazdy na lewo?,
rijbewijs kopen, rijbewijs b kopen, vals rijbewijs kopen, rijbewijs b kopen in belgie, rijbewijs kopen prijs, rijbewijs kopen legaal, rijbewijs kopen 247 ervaringen, rijbewijs kopen online, rijbewijs kopen belgie, nep rijbewijs, motorrijbewijs kopen, kan je een rijbewijs kopen, koop een rijbewijs, motor rijbewijs kopen, rijbewijs kopen betrouwbaar, neppe rijbewijs kopen, auto zonder rijbewijs kopen belgie, rijbewijs koop, rijbewijs kopen nederland, auto zonder rijbewijs kopen, rijbewijs kopen belgië, rijbewijs kopen belgie, rijbewijs kopen in nederland, rijbewijs b belgie, rijbewijs kopen met registratie.
Good job. Superb collection at Best Deals Shoes.
Very educational, thank you. Your feet deserve comfort from Best Deals Shoes.
Your website is really cool and this is a great inspiring article.
I genuinely enjoy studying on this internet site, it contains fantastic articles.
I like the helpful info you provide in your articles.
I really like your blog, the information you’ve provided on the website
Nice! Your article is extremely attractive and interesting, I need to to thank you for this great read!
You make blogging look like a walk in the park! I’ve been trying to blog daily but I just cant find writing material. 무료 카지노사이트
Thanks for your insight for the great posting. I am glad I have taken the time to see this. 슬롯사이트 순위
Nice!! Great Info. Great People. Great Blog. Thank you for all the great sharing that is being done here. 바카라사이트 추천
I love the expression. Everyone needs to express there own opinion and feel free to hear others. Keep it up 토토사이트 순위
I am hoping to view the same high-grade blog posts from you later on as well.
무료 카지노사이트
If you keep it like this, I ll visit you every day.
슬롯사이트 순위
I will continue to grow. If this part is maintained
바카라사이트 추천
The cool things here. I am very satisfied to see.
토토사이트 순위
What you presented was well researched and well written to get your stand on this over to all your readers.
무료 카지노사이트
Volwassen inhoud streamen op een veilige manier door te kiezen voor geverifieerde adult websites.
Kies voor veilige platforms voor discreet vermaak.
my web-site … LESBIAN PORN VIDEOS
“Awesome ideas for a fun night out! If you’re planning a celebration, Cheap Limo & Black Car Service offers stretch limos and party rides around Dallas so you can enjoy the evening safely and in style!”
https://cheaplimoandblackcarservice.com/
Se você se deparar com esta mensagem buscando comprar uma carteira de motorista registrada sem os exames então estamos aqui para ajudá-lo, basta clicar no link abaixo para falar com um agente. o agente irá orientá-lo sobre como obter a carteira de motorista
https://imt-cartadeconducao.com/
Als u dit bericht tegenkomt waarin u probeert een geregistreerd rijbewijs te kopen zonder de examens, dan staan wij voor u klaar. Klik eenvoudig op de onderstaande link om met een agent te praten. de agent zal u begeleiden bij het verkrijgen van het rijbewijs b
https://mijnrijbewijscbr.com/
Se ti imbatti in questo messaggio che cerca di acquistare una patente di guida registrata senza gli esami, allora siamo qui per te, fai semplicemente clic sul collegamento in basso per parlare con un agente. l’agente ti guiderà su come ottenere la patente di guida
https://patentediguidafacile.com/
Als u dit bericht tegenkomt waarin u probeert een geregistreerd rijbewijs te kopen zonder de examens, dan staan wij voor u klaar. Klik eenvoudig op de onderstaande link om met een agent te praten. de agent zal u begeleiden bij het verkrijgen van het rijbewijs
https://echtrijbewijskopen.com/
Se você se deparar com esta mensagem buscando comprar uma carteira de motorista registrada sem os exames então estamos aqui para ajudá-lo, basta clicar no link abaixo para falar com um agente. o agente irá orientá-lo sobre como obter a carteira de motorista
https://cartadeconducaoimt.com/
zarejestrowane prawo jazdy na naszej stronie internetowej bez zdawania testów lub egzaminu praktycznego. Potrzebujemy tylko Twoich danych, które zostaną wprowadzone do systemu w ciągu najbliższych ośmiu dni. Prawo jazdy musi przejść taką samą procedurę rejestracji, jak te wydawane w szkołach jazdy,
https://mojeprawojazdycek.com/
Nieuwste porno platforms bieden geavanceerde inhoud voor volwassenen. Kies voor veilige nieuwe hubs
voor veilig kijken.
Here is my web page stepsister blowjob
Thema’s voor volwassenen is breed beschikbaar op speciale platforms voor volwassenen. Kies voor veilige sites voor veiligheid.
Here is my web-site STEPSISTER BLOWJOB
Site voor volwassenen biedt een reeks video’s voor adult entertainment.
Kies voor betrouwbare platforms voor een veilige ervaring.
Also visit my webpage; stepsister blowjob
It’s enormous that you are getting ideas from this post as
well as from our argument made at this place.
Feel free to surf to my homepage; buy xanax without prescrition
Seksuele inhoud is breed beschikbaar op speciale platforms voor volwassenen. Kies voor gegarandeerde bronnen voor veiligheid.
Look at my blog post; STEPSISTER BLOWJOB
Bilgi yeterli.
Ben de Van escort araştırıyordum.
Teşekkürler.
my homepage https://asicwiki.org/index.php?title=Van_Escort_Bayan
Adult content is available on various adult websites for entertainment.
Always choose reliable adult sites for a protected experience.
Feel free to visit my web-site; STEPSISTER BLOWJOB
Inhoud voor volwassenen kunnen worden gestreamd op betrouwbare platforms voor
privacy. Ontdek gegarandeerde videobronnen voor kwaliteitsweergave.
Also visit my homepage … online viagra pharmacy
This is nicely said! !